Blog

4 Most Common Cycling Injuries – and How to Avoid Them

Cycling improves overall function in your lower body and strengthens your leg muscles without overstressing them. It targets your quads, glutes, hamstrings, and calves. Although it’s inherently a low-impact exercise on your joints, there are some precautions people should take. Check out the four most common cycling injuries – and, most importantly, how to avoid them! Need our guidance and support? We are here!

Cycling – whether indoor or outdoor – gets a reputation as a pretty “easy on the body” venture.

After all, while cycling is a great way to strengthen your heart and lungs, it’s inherently low-impact on your joints.

It’s also scalable, making it an excellent workout for cardio newbies and endurance veterans alike.

That said, just like with any exercise, if your technique isn’t on point, cycling injuries are more likely to hit your body.

We’re not just talking about traumatic injuries like a pulled muscle or broken bone from falling off of your bike.

Incorrect set-up and riding mechanics can lead to overuse (aka wear-and-tear) injuries that can very quickly drain the fun from your workouts — or halt them altogether.

Here, experts share the four most common cycling injuries, along with the best ways to prevent aches and pains while cycling.

1. Saddle Sores

Every cyclist knows the literal pain in the butt that starting a biking routine can be.

But sometimes, it’s not just general groin soreness that’s a problem.

Many riders can develop straight-up saddle sores when cycling.

What are saddle sores?

They are patches of skin on the buttocks or groin that, due to friction against the bike seat, get irritated, inflamed, and if they open, can even get infected, explains professional cycling coach Garret Seacat, CSCS.

How to Avoid Them

As common as saddle sores are, they are not OK, or something to just accept will happen.

When getting started with a new bike – or if you have any discomfort – Seacat recommends going to a specialty bike shop to get fitted for a bike seat.

“There is often a device you can sit on that will measure where your sitz bones are,” he says.

When riding, you should be perched on top of these sitz bones (aka the ischial tuberosities) and not scoot back and forth.

Seacat says that when people have rear-end pain, they often look for a wider seat, but a narrower one may actually be what enables you to get into a correct, more comfortable position.

And while you’re at it, buy special cycling shorts.

“When you’re cycling, without a doubt, the best investment you can make is the bike itself, but close behind are cycling shorts,” Seacat says.

Look for a pair ergonomically cut for your biological sex, he says.

Resist the urge to wear underwear with them; doing so increases your risk of chafing.

2. Knee Pain

There’s a reason that patellofemoral syndrome – pain at the front of the knee, around the kneecap – is sometimes called “cyclist’s knee.”

“People who cycle tend to get a lot of knee injuries due to muscular imbalances,” says kinesiologist Jake Harcoff, C.S.C.S.

One primary reason: Cycling develops the quads and hip flexors while keeping them in a shortened, flexed position.

“The quads can get so tight they pull on the tendon that goes over the top of the kneecap,” he explains.

It’s also common for cyclists to have their seats incorrectly positioned, which can dump more stress into overly tight, overworked tendons and ligaments, he says.

How to Avoid It

For immediate relief, check your bike seat’s height. When you stand next to the bike, it should be at hip height.

And when you’re cycling, your knee should never completely straighten, Seacat explains.

(Remember, you should pedal through the balls of your feet, not your heels.)

Over the long-term, focus on integrating posterior-chain-strengthening exercises like deadlifts, hip thrusts, and reverse lunges into your workout routine.

Doing this will strengthen the muscles that connect to the back of your knee, helping to balance out your leg musculature and reduce your risk of cycling injuries, according to Harcoff.
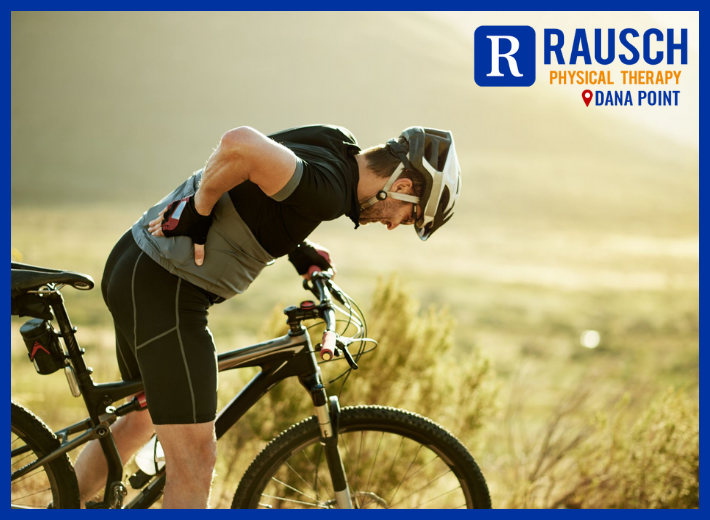
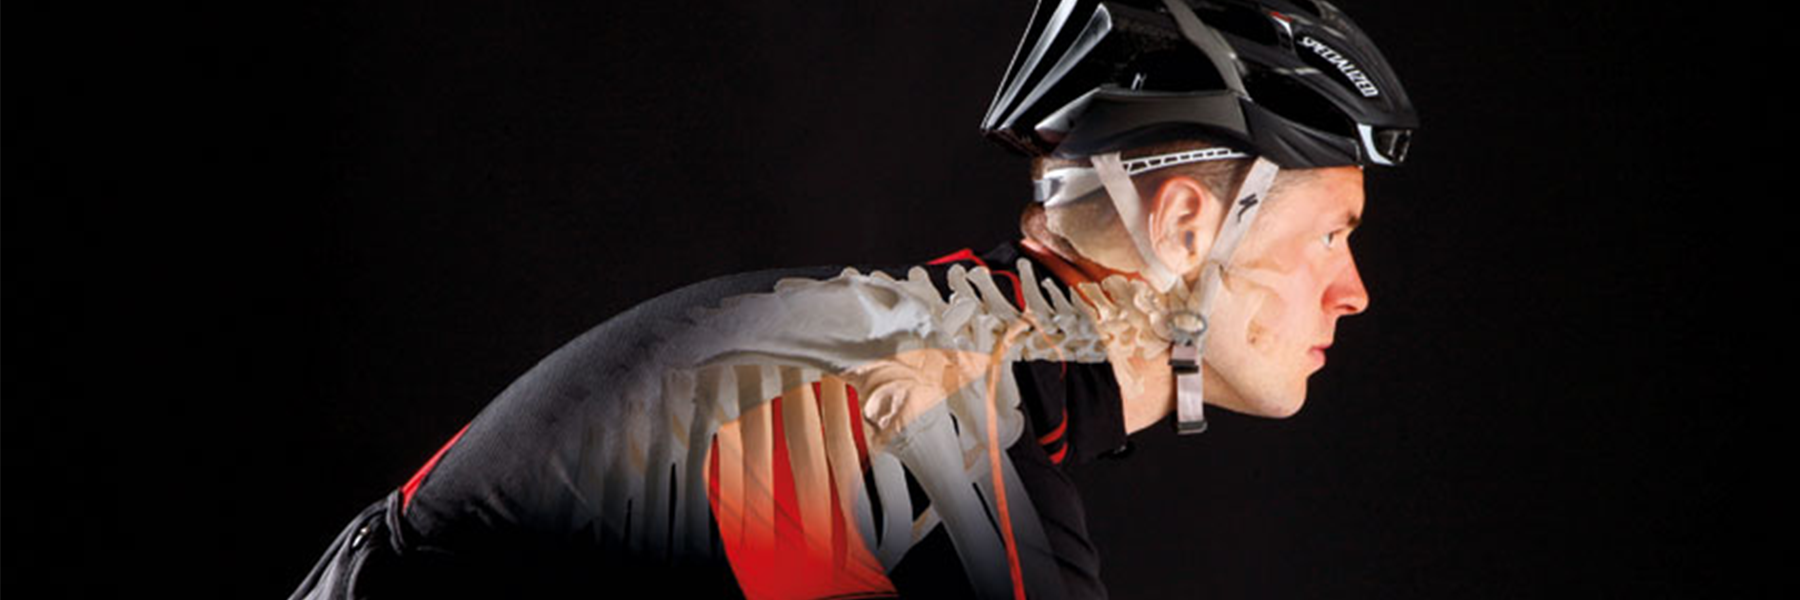
3. Lower Back Pain

Tight hip flexors can make more than your knees ache. They can also throw your lower back out of whack, Harcoff says.

He explains that it’s common to see cyclists have what’s called an anterior pelvic tilt.

With such a tilt, the hip flexors pull the front of the pelvis toward the floor, angling the buttocks upward and making the lower back arch excessively.

That can stress both the spine and the muscles and tissues that help support it.

How to Avoid It

Cycling tightens the hip flexors, so you need to perform stretches dedicated to relaxing them.

Harcoff says one of the best stretches you can do to relieve tension in the front of your hips is the couch stretch.

To perform the couch stretch:

  • Get on one knee facing away from a couch.
  • Raise your back foot until your foot is directly above your back knee, then scoot back to brace your shin against the couch.
  • With your opposite foot on the floor in front of you, squeeze your glutes and breathe. You should feel a deep stretch in your back leg’s hip and thigh.
  • Work up to holding the stretch for 90 seconds or longer, and never push through the pain.

4. Elbow and Wrist Pain

While anyone who keeps their arms locked out or leans forward when cycling is likely to experience some upper-body joint pain, these cycling injuries are most common among people who take indoor cycling classes, Harcoff says.

Because indoor cycling classes typically involve a lot of upper-body movements that use the handlebars, many class-goers (and instructors) lean forward excessively when riding.

As a result, they can stress out their elbows and wrists.

How to Avoid It

You shouldn’t need to put a ton of pressure on your arms to keep from falling forward on your bike whether you’re sitting or standing.

If you’re unable to perform upper-body moves or hold onto the handles without dumping your weight into your hands or locking out your elbows, you likely need to spend the bulk of your time riding upright.

Then, between classes, you can work on developing the core strength necessary to take a more forward posture without potentially irritating your arms.

Focus on stability and anti-rotation exercises like the planks, dead bug, and Pallof press.

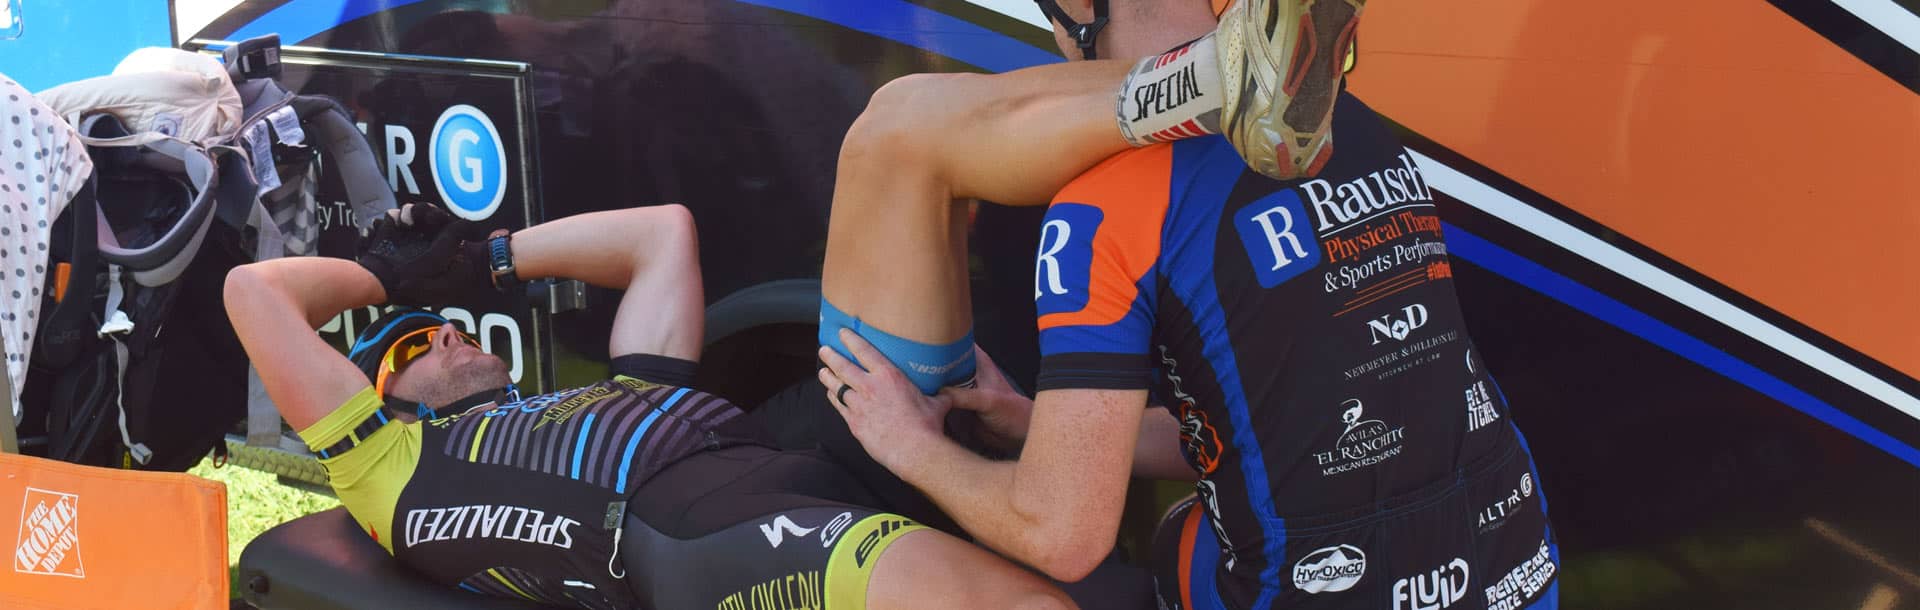
Regain strength and reclaim your mobility with Rausch PT. Your physical therapist will create a customized program just for you and your needs. Start your journey to recovery today — (949) 276-5401. Don’t forget to join us on our Facebook page.


You can contact  from https://www.trainabsolute.com to learn more about cycling and endurance training!

Reference: [https://www.beachbodyondemand.com/blog/cycling-injuries]

Bikes & Bagels: Monthly Mountain Bike Ride


Join Rock N’ Road Cyclery and #TeamRauschPT for a fun, free social mountain bike ride for beginners and intermediate riders every 2nd Saturday of the month!

Meet here at Rausch PT (30100 Town Center Dr #Y/Z, Laguna Niguel, CA 92677) at 8 AM, ride leaves at 8:30 AM. Post-ride bagels & beverages + awesome giveaways & raffle prizes.

Let us know you’re riding with us!

Go to the Facebook Bikes & Bagels Event page and click “Going.” Be sure to share with your MTB friends while you’re there!

[button link=”https://www.facebook.com/events/725966817753250/” size=”large” color=”blue” align=”center” target=”_blank” ]Event Page RSVP[/button]


Making the Summit: How I Conquered Altitude Sickness While Hiking Mount Whitney


As a life-long outdoor enthusiast and doctor of physical therapy, PT Sean Swopes knows how dangerous and difficult high-altitude hiking can be for many people. Sean shares the unique way he prepared his body to battle the elements (and dreaded altitude sickness) while crossing off an item from his bucket list: summiting Mount Whitney.


BY SEAN SWOPES, PT, DPT, CSCS, RAUSCH PHYSICAL THERAPY

On July 16, I sought out to make a journey into the wild with my brother and father. The plan was to spend five days and four nights hiking our way north through the Eastern Sierras. Our experience would peak at the summit of Mount Whitney, reaching an ultimate elevation of 14,508 feet.

Anyone who’s done any amount of physical activity, whether it be hiking or cycling, will tell you that being at altitude changes everything. I’ve seen some of the most aerobically fit people fall apart once they’re at altitude. Having taken many trips to the Sierras throughout my life, I’ve learned this fact the hard way.

The months leading up to the hike, my main concerns were the distance and elevation. My main training modality was casual and competitive mountain biking, and while it did give me a big push for my cardiovascular training, I knew that alone wouldn’t prepare me for the 50+ miles I’d be walking with 50 pounds strapped to my back at 10,000+ feet.

Training Your Body to Adapt to Stress

Fortunately, during this trip, I felt great with no major signs of altitude sickness. I attribute this to not only mountain biking, but competitive mountain biking. The key difference is the extreme of how competition pushes the body to its limits. I hadn’t done any extensive altitude training within the weeks leading up to the trip, however I had taken my body—physically and aerobically—to it limits by racing at the Over the Hump series nearly every week this summer. That’s exactly what I was going to be putting my body through summiting three, 14,000+ feet mountains: Mount Langley, Mount Muir and Mount Whitney.

As a physical therapist, I like this concept of pushing your body to its limits as a training philosophy. I view the body as an instrument with a threshold of tolerance. As people age, their body tends to develop imbalances, weakness and stiffness, which decreases their body’s threshold for biomechanical stress (i.e. running, jumping, climbing, etc.) Consistent competitive racing forced my body to adapt and increased my body’s threshold, which enabled it to withstand more physical and aerobical stressors on my hike.

Still, there was one large unknown variable to conquer: altitude.

At high elevation, less oxygen can be inhaled per breath, which can cause hikers to experience early onset fatigue, or worse, altitude sickness. For most people, this takes effect when they get above 12,000 feet. To ensure my success at altitude, I got to the mountains three days early and went on two training hikes at 9,000-11,000 feet and slept at 8,000 feet; this allowed my body to acclimate.

The Challenge of Summiting Mount Whitney

If you look at Mount Whitney from the city of Lone Pine, just below the mountain range you’ll see two small peaks with a large peak just to the right. At the base of the two smaller peaks you are roughly at an elevation of 13,500 feet with 1,000 feet of elevation to gain over a distance of two miles. This is where most people feel the extreme effects of altitude, including my brother. He was hit with nausea, fatigue and a pounding headache, forcing him to turn around and head back to base camp.

With even more determination now, my father and I continued our ascent. It wasn’t until the last half-mile that he was met with his final challenge. The altitude was taking its effect on him, but luckily he wasn’t experiencing any other symptoms other than extreme fatigue. His body would feel fine at rest, however any physical exertion would drain his energy instantly. It was slow-going that last half-mile while he was forced to take breaks every 10 feet of hiking the variable rocky terrain, but in the end we both prevailed, reaching the summit and our goal destination at 14,508 feet.

The toughest endeavors always make the most memorable experiences. Think of your body as an instrument you are constantly fine tuning. Preparing for those tough, yet memorable life adventures to the top of any “mountain” in your life.

Nothing in the world is worth having or worth doing unless it means effort, pain, difficulty… I have never in my life envied a human being who led an easy life. I have envied a great many people who led difficult lives and led them well.
― Theodore Roosevelt


Sean Swopes, PT, DPT, CSCS graduated from CSU Fullerton with a bachelor of science in kinesiology. He went on to receive his doctorate in physical therapy in 2015 from University of St. Augustine, and began his career here at Rausch Physical Therapy and Sports Performance. Sean is also a certified Strength and Conditioning Specialist. As a physical therapist, Sean’s goal is to help his patients understand their musculoskeletal impairments and work together to improve them.

Learn more about Sean and our other physical therapists »

How to Get Your Body Bike-Ready


The only things cyclists should have to worry about wearing out are their tires—not their joints! Mountain Bike PT Sean shares how to stabilize three key areas of the body to prevent most cycling-related injuries.


BY SEAN SWOPES, PT, DPT, CSCS, RAUSCH PHYSICAL THERAPY

There are certain rules-of-thumb when it comes to the human body and how we are designed to move; our bodies are designed to walk, stand, sit, sleep and eat. Not on that list? Ride a bicycle.

However, that doesn’t stop us humans from having a lot of fun riding them! In fact, with research, experience and continued learning, we can make body and bike work well together. One way is to get a bike fit, which sets up the bike’s geometry to best fit the rider. You can also find a program like Ride Right, which focuses on the rider’s biomechanics. However, the most important (and oft forgotten) step if you’re planning to get into any type of cycling is first getting your body ready to tolerate all the stress it will endure while pedaling, climbing and descending.

As the Mountain Bike PT, I work with a lot of cyclists who deal with chronic pain or injury without realizing that they need to get their body in the correct balance. Like I said, the human body was not designed to be on a bike, but if you focus on and prepare a few key musculoskeletal areas, you can ride for miles without the unwanted stress.

The most commonly injured areas on a cyclist’s body are the knees, back and hips. If you can get your body in an optimal balance of strength and flexibility (also known as stability) in these areas, you can prevent most injuries on the bike.

Sean’s “Bike Bod” Exercise Program

Here are five exercises to help you gain the crucial knee, back and hip stability you need to avoid most cycling-related injuries before you even hop on the bike:

  1. Thoracic extension over a foam roll. The goal of this stretch is to improve the mobility of the thoracic spine to improve the postural alignment of the spine and decrease unnecessary stress to the lumbar spine.
  2. Prayer Stretch (Child’s Pose.) This a truly versatile stretch that can improve your overall mobility. The key is to prevent your lumbar spine from becoming overly-flexed to emphasize maximal mobility out of the hips.
  3. Hand Up Stretch (Couch Stretch.) The focus of this stretch is to improve your quadriceps and hip flexor mobility. The key is to maintain a posterior pelvic tilt (flatten the curvature of your lumbar spine) while sitting up tall.
  4. Squat with a stick overhead. This is not only a great exercise, it’s also an assessment. It will point out the flexibility and lumbopelvic (core) weakness you have.
  5. Dynamic LE warm up: Worlds Greatest Stretch (WGS) and Inchworms. WGS will take every aspect of the body to its end-range to prepare it for what’s to come, while inchworms focus on improving mobility of the entire posterior chain.


*Check back soon for my video explaining more about these five exercises!


Conclusion

As an avid cyclist, the only things you should have to worry about wearing out are your tires—not your joints. By taking the time and doing the work to optimize your body stability, you can defy human nature and adapt your body to your bike so you can continue to enjoy riding for many years, pain-free.


Sean Swopes, PT, DPT, CSCS graduated from CSU Fullerton with a bachelor of science in kinesiology. He went on to receive his doctorate in physical therapy in 2015 from University of St. Augustine, and began his career here at Rausch Physical Therapy and Sports Performance. Sean is also a certified Strength and Conditioning Specialist. As a physical therapist, Sean’s goal is to help his patients understand their musculoskeletal impairments and work together to improve them.

Learn more about Sean and our other physical therapists »

Three Easy Ways to Avoid Neck Pain While Cycling


Don’t let cycling be a pain in the neck. DPT Max Biessmann shares his three quick fixes for helping alleviate and prevent pain, aches and soreness in the upper back and neck while on your bike.

BY MAX BIESSMANN, DPT, RAUSCH PHYSICAL THERAPY
USAT LEVEL I COACH, ASCA LEVEL I COACH, USA SWIMMING COACH


Approximately 66 million Americans enjoy cycling for sport, and why wouldn’t they! It’s a great workout, social, and is perfect for cross training or for people with chronic injuries because of the reduced impact cycling has on the body. Unfortunately, many cyclists find themselves struggling with pain or discomfort, whether it’s the inability to get comfortable on the saddle or one of the most common complaints: neck/upper back pain and discomfort. Many people complain of pain ranging from soreness and aching, to numbness or tingling in their arms and hands, to sharp shooting pains in the neck and arms.

What Causes Neck Pain While Cycling

While cycling, your neck is in an extended position, doing its best to hold up your rather heavy head (the average head is 10 to 11 lbs.) Not only must your muscles do all the heavy lifting since the spine is unable to support the weight directly, but this also causes a closing down of the facet joints in your vertebrae. This constant closing can cause nerve irritation and excessive wear and tear on the joints.

As with anything you do, the longer you spend in a specific position, the more your body adapts to maintain that position. So, when you’re spending hours and hours per day hunched forward at your desk, in front of a laptop, looking at your phone, and on your bike, the more your body adapts to this position. This can cause the common posture dysfunction upper crossed syndrome, which is when your neck extenders (the muscles you use to look up) get short and tight, while the deep neck flexors (the muscles that tuck your chin down) get stretched out and relatively weakened.

Three Easy Ways to Avoid Neck Pain While Cycling

This combination of muscular imbalances and decreased nerve root space can lead to any combination of symptoms from chronic aching to shooting pains. Luckily, there are several very simple things you can do to decrease these symptoms if you already have them or prevent them from starting in the first place.

#1: Check how you’re riding your bike
Lawrence performing a Bike Right session at Rausch PT.The first thing to consider is how you’re riding your bike; a very small change here can have a big positive change. Are your arms always locked out at the elbows? Do you have a death grip on the bars? Are your shoulders hunched up and stuck in your ears? All of these can lead to cycling pain. Here are some quick fixes to make sure you’re riding your bike right:

  • Make sure your elbows are slightly bent in order to allow your arms to absorb vibrations and impacts from the road or trail.
  • Your hands should be snugly gripping the bars or hoods, but still staying relaxed in order to allow proper blood flow.
  • Shoulders should be relaxed and loose to help absorb shocks your elbows can’t absorb alone.
  • Make sure to look forward with your eyes as well as your neck in order to try and reduce some of the extension in your neck.
  • Check your helmet; it may be sitting too low on your forehead and obstructing your view causing you to look up more.

Remember, while cycling the only part of your body that should be working really hard is your legs; make sure you’re keeping your neck, shoulders and arms in a relaxed ready to go state. If you don’t feel you’re moving correctly on the bike, schedule a Bike Right session and have a physical therapist assess how you’re moving on your bike; having someone else watch you ride can help isolate the specific movement deviations and bad habits you may have developed over time.

#2: Work your body

To help prevent some of the adaptive muscle shortening and nerve compression from cycling, try these 10 simple exercises and stretches. These are also great exercises to do if you work at a desk a lot!

Stretches/Mobility:
  1. Pec Stretch: Stand in a doorway and put your arms out to either side and slowly lean forward until you feel a stretch through the front of your chest into your armpit. Play with the height of your arms above, at or below your shoulders to get the various fibers of the muscle. Do 2-3x for about 30 sec each.
  2. Upper Trap/Scalene: Sitting in a chair, grab the bottom of the chair and side-bend away from that side. Look up for a scalene stretch and look down for a upper trap stretch. Do 2-3x for about 30 sec each side.
  3. Neck Extensors: While sitting, gently pull the back of your head forward while gently pushing in on your chin till you feel a stretch just at the base of your skull. Don’t crank on this one, take it easy on your jaw, it should be a fairly gentle stretch. Do 2-3x for about 30 sec.
  4. Pec Release: Take a tennis or lacrosse ball and place it between your chest, near the front of your armpit, and the wall. Roll the ball around until you find any tender spots and spend about 10-20 sec massaging that area. Spend about 1 min on each side
  5. Upper Trap Release: Place a tennis or lacrosse ball in pillow case and lean against the ball and a wall anywhere between your shoulder blade and spine up through the base of your neck. Massage out any tender or sore spots for about 10-20 sec per area; spend approximately 1 min on each side
  6. Foam Roll Extensions: In order to take strain off of the joints of your neck make sure your upper back can move well. Lie across a foam roller on your back with your arms supporting your head and your hips on the ground and lean back to extend your upper back. Start about halfway up your back and continue up until just short of your neck. Do about 5 extensions at each spot moving the foam roller up about an inch each time.
  7. Towel Rotations: Wrap a small hand towel or pillowcase around the back of your neck, grab the ends with the opposite hands. Pull down to anchor the towel with one hand and pull the towel across your chin as you rotate your head, when you get to the end of your range add a little bit of overpressure from the towel to help stretch into the movement.
  8. Thread the needle: Begin in quadruped position (on hands and knees), place foam roll on the outside of one arm. Once there, reach with the arm furthest away from foam roll under the body to make contact on top of foam roll and roll through, rotating upper spine.


Strengthening:
  1. Chin Tucks: Begin by lying flat on your back with a soft pillow under your head. First gently press the back of your head into the pillow as you tuck your chin in, as if you’re making a double chin, hold for 10 seconds then relax, repeat 10-20 times. If this is easy practice against a wall while doing a wall sit.
  2. I’s, T’s and Y’s: Lying flat on your stomach, across a swiss ball or end of bed or couch, place your hands at your side (I) out to the side at shoulder height with thumbs up (T’s) or above your head and out to the side (Y’s). The focus of the movement is to move your shoulder blades not so much your arms, squeeze your shoulder blades together and squeeze for 10-15 seconds and relax, repeat 10-20x in each position. The Y’s will be the hardest so start with less reps here and advance as it becomes easier. While lying on your stomach focus on good posture through your entire spine all the way to the top of your head.


#3: Get a Bike Fit

If none of these “quick fixes” seem to help, it may be time to reassess your bike fit. First off, were you ever fit? If so, how long ago? Your body changes, so you should really get a bike fit every year or so.

There are many aspects of the bike fit that can affect how much strain and what kind of strain is being placed on your neck and upper back:

  • The most obvious is your handlebar height; the lower they are the more you have to look forward to see (looking at you, triathletes!)
  • The length of your bike, the distance between saddle to handlebar, can also affect how much you have to reach and how you carry your weight through your arms.
  • The width of your handlebars may be too wide or to narrow, which can make it difficult for your arms to rest or settle in a comfortable position.
  • Triathletes, look at both bullhorn and aerobar pad positions.
  • The angle of your hoods on a road bike might pitch the angle of your wrists and affect how you carry your weight through your arms.
  • The tilt of your saddle can cause you to be unbalanced between handlebars and saddle.


Nikki performing a Bike Fit at Rock N’ Road Cyclery Laguna NiguelBike fitting should be left to a professional fitter, as small changes in one area of the bike can have a huge effect on other parts of your body. A proper bike fit is a valuable service; these pros can make the necessary adjustments to your machine that will help with comfort, injuries and power output. You can google around for local bike shop that does Bike Fits, or if you’re in South Orange County check out Rausch PT’s tried and true favorites:


Conclusion

Don’t let neck pain stop you from enjoying the sport you love. By making a few quick adjustments and getting a professional bike fit, you can continue to ride hard and ride long for many years to come.


StaffHeadshot-MaxMax Biessmann, DPT is a licensed physical therapist at Rausch Physical Therapy & Sports Performance. He received his Doctorate of Physical Therapy degree at the University of St. Augustine, San Marcos in 2016 and started his career at Rausch PT. Max is passionate about helping people achieve their goals through physical therapy and innovative rehab technologies. As the Endurance Sports PT, Max says he’s lucky to be able to combine his professional coaching experience and PT knowledge to help his patients achieve their personal bests in sports and daily life.

Learn more about Max and our other physical therapists »


Proper Lower-Body Alignment for Maximum Pedal Power


Are poor cycling mechanics effecting your power output? Dustin shares his thoughts on proper biomechanics on the bike, as well as the single exercise you need to ensure all your hard work is translating to optimum pedal power.

Blog-Dustin
BY DUSTIN HANCOCK, DPT, RAUSCH PHYSICAL THERAPY
Are poor cycling mechanics robbing you of your precious pedal power? You can train long and hard to improve your performance on the bike, but if your body alignment is off, you’re putting yourself at risk for both injury and power loss.

For cyclists, proper biomechanical alignment in these three lower extremities is the key to not only avoiding injury, but also to increasing your power output levels.

Hips

As the powerhouse of the body, the hips are an important aspect of a cyclist’s biomechanics. There are several common issues cyclists face in this area, such as overuse of the quadriceps muscles while pedaling, as well as tightening of the hip flexor from sitting for too many hours in a day.

Tight hip flexors inhibit the most important hip extensor muscle, the gluteus maximus, while a lack of full flexion results in compensations at the spine, which can cause joint stress, compression of the discs, lower back pain, and saddle-related pelvic floor dysfunctions.

The “best” hip position while riding is different for each person, which is why it’s important to get a professional evaluation to figure out the natural shape of your hips (Q-angle) and ideal riding style. However, the general rule is to imagine a plumb line from the hip through the middle of the knee and finishing between your second and third toes. Since everyone is different in shape and size, the best position is usually the most natural feeling to you; so, hop on a trainer, close your eyes, and feel to the path of least resistance.

Knees

Think of your legs as pistons; as they attack a hill, they need to keep the power straight and consistent to operate effectively. As a physical therapist, I always perform a frontal plane exam on cycling patients to check that their knees are tracking correctly, as poor alignment causes power loss and puts you at risk for injury.

My frontal plane exam simply consists of having my patients stand in front of me and perform a Single Leg Squat. The squat simulates the cyclist’s foot position, and it shows me what my patient feels is comfortable. In my evaluation, I look to see if the feet are turned out, which results in a collapsed arch and can cause a deviation or torsion strain at the knee. I also check if the hips move backwards first when the patient squats, indicating it’s a gluteal-dominate movement, so the trunk of the body can stay controlled, which ensures core/hip stability. The knee should not go past the toes, and I also advocate for the shins staying as vertical as possible to take stress off the ACL—the most important ligament in the knee.

You can perform a frontal plane exam yourself at home by performing a Single Leg Squat in front of a mirror. As you squat, check that you’re keeping the knee tracking wherever the second and third toes are pointed; this ensures all your power is being transferred to the bike.

Ankles

Your ankle joint positioning is important to efficiently transfer the power into the pedal without any leaks in the system. There are generally three postures of cyclists—toe-down (stabbers), neutral/horizontal, and heel dropped—each of which has some pros and cons. The toe-down posture is designed for flexibility or compliance to the surface beneath, while the neutral/horizontal and heel-dropped ankle postures are understood to derive more power.

Heel Drop: Good

The human body is structurally designed to allow us to use muscles as pulleys and produce power to accelerate our body. When the ankle is in the heel-dropped posture, the ankle is positioned so that you have the least power transfer loss; this is known as a “closed pack” position” in medical terms, meaning the shape of the bones lock into place and all ligaments are in tension. This stiff ankle joint position allows every watt to transfer into the pedal.

Toe Down: Not So Good

If your toe is pointed down in the stabbing posture, typically you’ll lose power on the downstroke, as the ankle will suck up some watts in this “softer” ankle joint position. The analogy that helps the understanding of this concept is to think, “What is more efficient when climbing a steep hill, a bike with full suspension opened up in the rear, or a hard tail or lock out in the rear?” The full suspension example above is like having the stabbing ankle posture (too soft and springy) and as you power stroke up the hill you are leaking power.

Again, each individual is different, so I say the most comfortable, relaxed ankle posture is what’s best for you. However, biomechanically speaking, you may have an advantage dropping the heels during the power stroke to ensure all the power and hard work goes where you want it to.

Prescription for a Quick Fix

There is one particular exercise cyclists can do off the bike to ensure their lower-body biomechanics stay in check: the Single-Leg Squat on an unstable surface (such as a BOSU® Ball*.)

Correct Single-Leg Squat Mechanics:

  • Hips move back first
  • Toes stay relaxed while ankle stays relatively flat to the ground
  • The motion down is controlled and super slow (at least six seconds) with good alignment
  • Finish strong by going back up fast, squeezing the buttock at the top

Start with 10 to 15 reps focused on form, then work up to three sets of 10 to 15 reps, two to three times a week.

*If you don’t have a BOSU®, use a pillow as the unstable surface.

Applying the PAP Theory for MTB

To make this “quick fix” exercise more sport-specific, mountain bikers can apply the Post-Activation Potential (PAP) theory to help unleash greater potential power gains for exploding up those steeps hills.

PAP is a high-level training concept that combines heavy-resistance strength training with explosive plyometric, sport-specific movements. The concept of “explosion timing” and the focus on quality alignment under heavy loads is at the foundation of each movement.

[vsw id=”QmIhTkEQFsA” source=”youtube” width=”425″ height=”344″ autoplay=”yes”]

Single Leg Squat Using PAP:

  1. Stand on one leg. Squat in a controlled and slow downward motion (five to six seconds down) with a focus on good alignment.
  2. Start the upward motion slowly for one to two seconds, then explode to finish.

Applying the PAP theory to a Single Leg Squat—with a two-second delayed, explosive movement—will not only improve your cycling biomechanics, but also your climbs.


DustinDustin Hancock, DPT graduated from San Diego State University with a bachelor’s degree in kinesiology/nutrition. He went on to receive his doctorate in physical therapy in 2011 from University of St. Augustine, and began his career at Rausch Physical Therapy and Sports Performance in 2012. As a snowboarder and mountain bike enthusiast, Dustin specializes in treating extreme sport athletes. As a physical therapist, Dustin says he looks forward to being a companion every step of the way on his patient’s path to recovery.

Click to learn more about Dustin and our other physical therapists »

Quick Fix for Dead Spots in Your Pedal Stroke

Blog-Dustin
BY DUSTIN HANCOCK, DPT, RAUSCH PHYSICAL THERAPY
When cycling, there are two things that can improve your velocity: power output and turnover cadence. However, the overall power output can be weakened if at some point during your pedal stroke, you have inconsistencies during that full, circular motion. Inconsistent torque forces, or dead spots, typically occur at the initiation of the upstroke. You can determine if you have dead spots by using a power meter or by doing a test like our Performance Lab’s Bike Right, but a simple indicator if your stroke has dead spots is smashing and hammering of the pedals.

Like most exercise movements, a healthy pedal stroke relies on the stretch shortening cycle (SSC) to be efficient. SSC occurs when a muscle stores elastic energy as a muscle lengthens; this stored-up energy is then used when the muscle immediately shortens. Since SSC is a myofascial and nervous system stretch reflex, if the body has adequate mobility and dynamic stiffness, the SSC will allow for any athlete to access free kinetic energy, i.e. more power for less work! Improving SSC can not only be a huge efficiency booster, it can also help improve joint stability and congruency to save those knees from arthritic changes.

Quick One-Legged Exercise to Improve Dead Spots

Here’s a great neuromuscular recalibration drill that you can do on a trainer to improve those dead spots.

Step 1: Hop on a trainer and warm up with the smooth circular stroke pattern focused on relaxing your legs especially your ankles.

Step 2: When you feel warm and ready, pick up the cadence to 92-95 rounds per minute (RPM) and take one foot off the pedal. Place that foot in the center frame.

Step 3: Maintain the cadence for 30-second intervals, working up to 90-second intervals for three to five rounds.

This exercise ensures the leg pulls up at the bottom of your stroke, allowing the hamstring to apply more power into the equation. It also improves the circular stroke pattern and gets you away from that less effective “smashing pedal” form. Try to apply this exercise to your warm up and see what it can do for your cycling efficiency and overall speed.

Enjoy one more thing to think about on your ride!


DustinDustin Hancock, DPT graduated from San Diego State University with a bachelor’s degree in kinesiology/nutrition. He went on to receive his doctorate in physical therapy in 2011 from University of St. Augustine, and began his career at Rausch Physical Therapy and Sports Performance in 2012. As a snowboarder and mountain bike enthusiast, Dustin specializes in treating extreme sport athletes. As a physical therapist, Dustin says he looks forward to being a companion every step of the way on his patient’s path to recovery.

Click to learn more about Dustin and our other physical therapists »