

As “The Endurance PT” at Rausch Physical Therapy & Sports Performance, it makes sense that Max Biessmann’s favorite saying is, “Always remember to enjoy the journey, the destination will take care of itself.”
Max has been on some pretty epic journeys in his own life so far. From a summer spent in Germany as a college intern in a virus/stem cell laboratory (when he also competed in his first IRONMAN in Frankfurt) to now nine IRONMANs later and a doctor of physical therapy degree to boot, Max is proof that you’ll always wind up where you belong—if you can keep your head in the game.
Max’s first taste for physical therapy came while rehabbing a calf injury that was threatening to stop him from running the Frankfurt IRONMAN. The experience made Max the Microbiology Student more interested in human movement and sports performance, compelling him to take sports physiology and kinesiology courses. While unfortunately it was too late to switch his focus, Max never gave up on his dream to combine his love of science with sports. After graduating with a degree in microbiology, Max found success as a swim coach and worked part-time in a local bicycle/triathlon shop, all while taking classes in anatomy and physiology, until finally deciding that physical therapy school would be his ticket to the rewarding career he always dreamed of.
While he may have taken a winding course to get to his final destination here at Rausch PT, Max says every part of his journey has only helped to build his expertise. For instance, as a coach Max can see movement dysfunctions and correct them with cues, and as a physical therapist he has the skills to manually affect the tissues to improve and reduce the limitation causing the dysfunction. As a triathlete, Max has an appreciation of the highly repetitive nature of endurance sports and understands the mental struggle at the core of all these types of events; mix it all up, and you have a recipe for the perfect Endurance PT.
In fact, Max’s love for endurance sports started when he was very young. Max started swimming competitively at the age of five, and says he was immediately drawn toward the longer freestyle events. In high school he chose cross country over track, and in college he left the UC Davis swim team to pursue triathlon.
“I really enjoy the challenge of competing against yourself, and the mental challenge of endurance racing,” Max said. “Of course there’s always competition to race against others, but at the very heart and soul of endurance racing is the self-conflict within yourself between the physical and mental.”
With ten IRONMAN competitions and plenty of trail, road, and open swim races under his speedo, Max has definitely experienced his fair share of internal struggle. Like in 2009, at the Arizona IRONMAN, when Max was desperate to qualify for Kona, but mentally broke down in the run and gave up on a race he says still haunts him; or take his best, “guttiest” race, the 2014 Vineman, when Max landed in the med tent (after winning the race) 15 lbs. lighter and severely dehydrated in need of two liters of fluid.
Currently, Max is gearing up to start his second season as a professional triathlete, however he says he’s even more excited to continue “coaching” his patients at Rausch PT.
“I’m excited to keep learning about the human body every day,” Max said. “I love combining the lessons I continue to learn from triathlon with my PT work—so I can become a better athlete, coach, and physical therapist. You have to always remember to enjoy the journey, the destination will take care of itself.”
The Four-Step (Dry) Swim Warm Up

While most triathletes focus on training for the run and bike portion of their race, it’s actually the swim that can make or break your day. A proper warm up is key to success—with or without being able to get into the water before your start.
 BY MAX BIESSMANN, DPT, RAUSCH PHYSICAL THERAPY
USAT LEVEL I COACH, ASCA LEVEL I COACH, USA SWIMMING COACH
It’s no secret that triathlon is a very difficult sport to find the time to train. Not only do you have to train a large volume to build the proper endurance, but you also have to find the time to train in three different disciplines.
Running and cycling share the most in common, as both are leg-driven sports and make up the majority of your race, and because of this, many triathletes will focus most of their time and effort into training for these two sports. However, I believe that it’s the swim portion of triathlon that’s the most important; a solid swim starts your day off right and sets you up for success for the rest of your event. As the saying goes, “You can’t win the race in the swim, but you can lose it.”
Beating the Rush
As the first of the three events on race day, the swim has an undoubtedly hectic beginning. Everyone is still fresh, nervous, and pumping with adrenaline, which makes for a fast and chaotic start to your day. Still, if you’re looking to place well or find the feet of the right person, it’s important to be able to handle this initial energy surge and settle into your pace after the first 300 to 500 meters.
A proper warm up is crucial to combatting this high-intensity rush so you can avoid overloading your body with lactic acid or excessively tapping into your anaerobic system, which is especially important since you’re about to do an activity with limited oxygen availability.
Fish Out of Water
Most events allow racers to get into the water before start time to warm up their arms and shoulders, get their wetsuit to “settle” onto the body, and acclimate to the water temp, which is especially helpful for those of us racing in So Cal in the cold Pacific Ocean. However, there are several very popular races on the IRONMAN circuit, such as Oceanside 70.3 or St George 70.3, that make it challenging or near impossible to get into the water before the start of the race due to race logistics.
While you should do your best to always get in the water before a race, a “dry swim” warm up using theraband tubing is another great way to get your arms and shoulders ready for the load of the swim. If for whatever reason you can’t get in the water before your race start (or even for your weekly swim workout) this “Dry Swim” Warm Up will quickly activate the stabilizing muscles of the shoulder complex to prepare you to swim at your best.
Four Steps, 10 Exercises: The “Dry Swim” Warm Up
In order to complete this warm up you’ll need a relatively long (3 to 4 ft.) piece of surgical tubing or theraband. Light resistance (green or red theraband) is best, as you’re not trying to load up the muscles or increase strength; this is just get the muscles moving and warmed up. The key is to focus on the speed and quality of the movement.
Step 1 – Complete your usual warm up or pre-race routine
- Start with your usual jog or dynamic stretch warm up to get your lower body and cardiovascular system ready, as these will carry you throughout the entire day.
- Put on your wetsuit so you can check in the morning clothes bags and be ready to go at any point.
- Don’t forget your body glide or lubricant for neck, underarms, etc.!
Step 2 – Get your shoulders ready to move
Begin with a few arm circles, forwards and backwards, both single and double arms. This is a great time to check and adjust the fit of your suit on the neck and shoulders. Make sure to move your whole shoulder complex, including the scapula. Focus on relaxed arms, generating the movement from the trunk and shoulders and preparing the joints for movement.
Then, go on to speed skaters. This involves bending at the waist and swing your arms side to side with a bit of thoracic spine rotation—another key point in being able to swim well. Speed skaters also help by adding a dynamic stretch to your pec muscles and anterior chest. Speed skaters can also be done standing, known as helicopters.
Do each stretch for about 15-30 seconds.
Step 3 – Waking up the shoulder stabilizers
Time to break out the theraband! A light-resistance piece of theraband or surgical tubing is all you need to wake up the muscles of the rotator cuff and scapular stabilizers and prepare your shoulder joint for the stresses that will be applied during the swim stroke.
Perform 20 to 30 reps or 30 seconds per exercise.
[one_half]
Internal/External rotations with arm at side
Start with your arm at your side with the elbow bent 90 degrees, then depress and squeeze the scapulas together. For external rotations, move your hand away from the body; for internal, move the hand towards the body.
[/one_half]
[one_half_last]
Rows
Standing facing the band with elbows bent about 90 degrees, squeeze the scapulas together and bring the elbows straight back. Make sure to keep the scapulas anchored and depressed the entire time.
[/one_half_last]
[one_half]
Flexion/Scaption Raises
Standing on the band, lift the band up to shoulder height with minimal hiking of the shoulder. Flexion is directly in front of the shoulder, and scaption is at about 45 degrees to the side.
[/one_half]
[one_half_last]
Standing Ys
With the band looped around a pole, start with both arms crossed and at the opposite hip. While squeezing the scapulas together and keeping your back straight, bring your arms up and out to form a Y shape above your head.
[/one_half_last]
Step 4 – Waking up the primary swim movers
The final step is to warm up the primary swim muscle: the latissimus dorsi muscle. This is the most swim-specific part of your warm up, and it’s a great time to work on the early, high-elbow arm position that’s critical for generating a good catch while swimming. As you move through these next four exercises, focus on the timing of the stroke pulls; start the movement slower and increase the speed through the back of the pull—just as you would with a normal stroke—then control the return (don’t just let the arm snap back to the front.)
Spend about one minute on each exercise; repeat until you’re warmed up and ready to go.
[one_half]
Standing Swimmers
Stand facing a pole with scapulas depressed and controlled pull from about shoulder height down to your hips. Your arms should move in a direct line with shoulders and hips.
[/one_half]
[one_half_last]
Front Quadrant Pulls
Bent forward with an active core and arms out in front of the shoulders, begin a stroke with a good high-elbow position and pull back until about the shoulder. Focus on coupling scapular depression and elbow flexion in order to wake up and perfect the timing of the arm engaging with the scapula moving.
[/one_half_last]
[one_half]
Butterfly Pulls
Both arms together do a front quadrant pull, but continue the motion all the way back to the hips. Make sure focus on accelerating the pull from shoulder to hip. Bring arms back out to the front underneath the body in a controlled fashion. Keep the arms controlled while recovering and don’t let them elevate above the shoulder. Do not bounce the whole body; focus on isolating the arms.
[/one_half]
[one_half_last]
Freestyle Pulls
Same as butterfly pulls, but one arm at a time. Work on adding a little thoracic rotation. Do the first few with an under-the-body recovery, then you can advance to a more freestyle-like recovery—just be careful of pulling on the shoulder while it’s coming up behind the hip.
[/one_half_last]
Conclusion
This warm up is a great way to help prepare for the swim—with or without being able to get into the water. Make sure to play around with the timing before swimming during normal training; some races will make you wait around a while in a chute before swim starts. Also make the routine your own, you might benefit from more time doing double arm butterfly pulls to help wake up your lats and primary swimmers, or more time with speed skaters and freestyles in order to help open up your stiff thoracic spine. It is still important to get into the water as soon as possible to try and swim if possible, get water into your wetsuit, and acclimate to the temperature of the water. At the end of the day, make sure you practice this and are comfortable doing it before your normal swim training sessions: never try anything new on race day!
Have fun out at the races. Each triathlon is an adventure, don’t lose sight of the journey by only thinking of the destination.
 Max Biessmann, DPT is a licensed physical therapist at Rausch Physical Therapy & Sports Performance. He received his Doctorate of Physical Therapy degree at the University of St. Augustine, San Marcos in 2016 and started his career at Rausch PT. Max is passionate about helping people achieve their goals through physical therapy and innovative rehab technologies. As the Endurance Sports PT, Max says he’s lucky to be able to combine his professional coaching experience and PT knowledge to help his patients achieve their personal bests in sports and daily life.
Learn more about Max and our other physical therapists »
Tackling Common Soccer Injuries
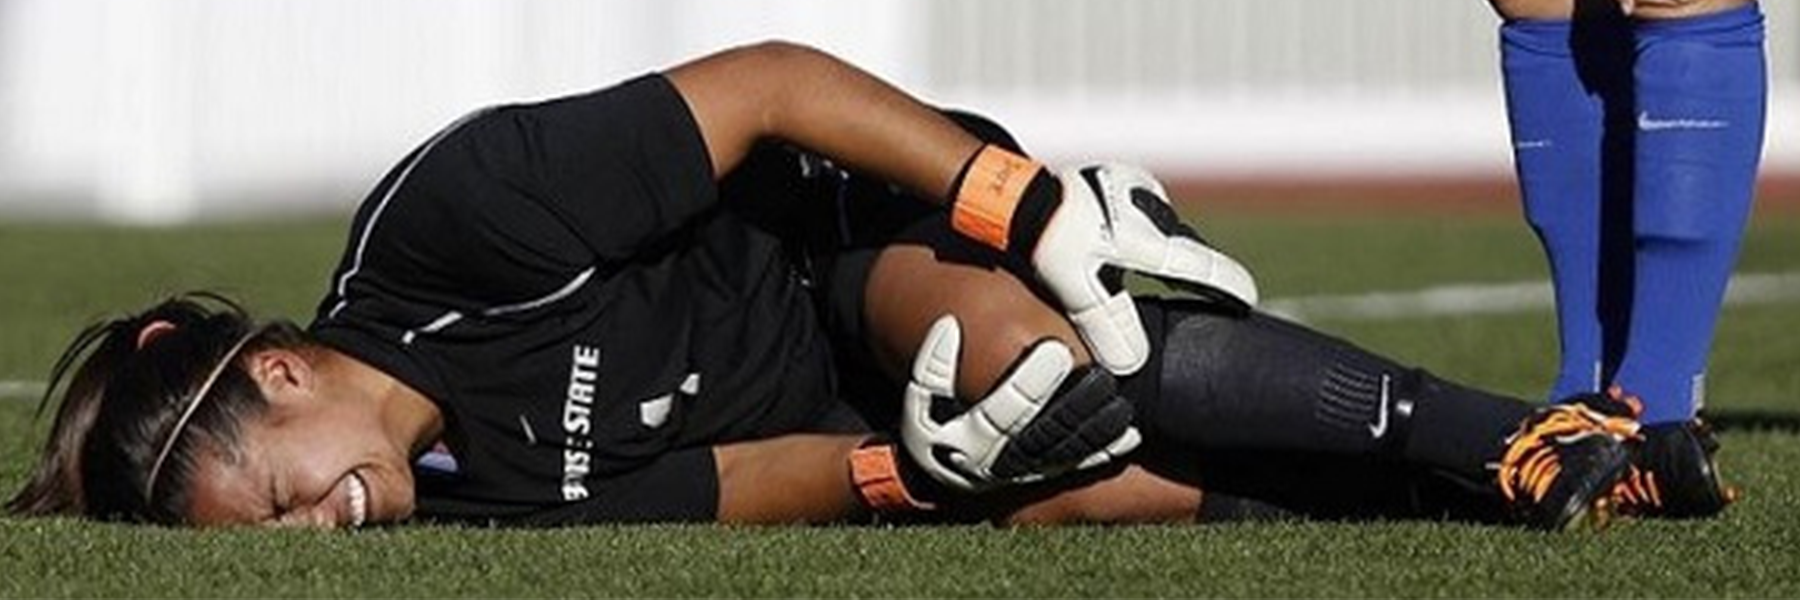
With the ever-growing popularity of soccer comes an increase in soccer-related injuries in players of all levels. PT Lyndsay explains who’s at risk for the most common injuries and why, and (more importantly) how to avoid sidelining and/or chronic injuries.

BY LYNDSAY DEFILIPPO, DPT, RAUSCH PHYSICAL THERAPY
While football, basketball, and baseball may be the most popular sports in the U.S., soccer reigns supreme in most other countries. Millions of people around the world love to watch and play soccer, with an estimated 200,000 professional athletes and 240 million players at lower-level amateur status.
With more people participating in this physically-demanding sport, coupled with a dangerous societal obsession with year-round competition (meaning little-to-no breaks for players,) we are seeing more and more soccer-related injuries. While head and neck injuries are not unheard of, the vast majority of soccer injuries occur within the lower extremity; of those injuries, the foot/ankle complex is the most affected, followed by the knees, thighs, and hips.
With this heightened rate of injury comes an increase in the time players are spending on the sidelines, unable to play the sport they love. Research shows that on average, soccer players will sit out seven to 30 days when they suffer mild to moderate injuries. However, when you compare that to the average time it takes for soft-tissue and bones to properly heal, you can clearly see that the timelines don’t match up.

Athletes are returning to sport too soon and playing on tissues that are still injured, placing them at increased risk for re-injury, as well as heightened risk for new injuries. You may ask, “Well why are the professionals back on the pitch faster than me?” Keep in mind, it is their job to play soccer, they are in PT and rehab sometimes 8 hours a day, and the team is losing money each minute they are on the bench. Many times a professional athlete will also return sooner than they should, again increasing their risk for further injuries or sustaining new injuries from compensations within the body.
Who’s At Risk, and Why?
While research is still on the fence as to what definitively causes the most injuries in soccer players, here are some of the more notable findings I’ve come across:
- Most soccer injuries occur in competition versus practice scenarios, when physical demands, contact, intensity, etc. are all heightened.
- A study by Hawkins and Fuller reported 59% of injuries were caused by non-body contact, while 41% are caused by body contact.
- Other studies show that tackling is the biggest cause of injury.
- Other factors to consider are body mechanics and alignment, gender, and time spent playing the sport, as well as outside variables, such as pitch surface, athlete footwear, etc.
Basically, there are plenty of sport specific factors that put players at risk of sustaining lower extremity injuries; again, the most common area for concern in soccer players. In fact, one study has shown ankle sprains account for 80% of injuries in soccer, compared to 40% across all other sports. Even if you’re lucky enough to have never “rolled your ankle” while playing soccer, you may be one of those players who has sustained other common lower-body injuries, such as a contusions, strains, sprains, muscle tears—and in more severe cases—ACL tears, meniscal pathologies, and MCL sprains.
Seven Ways to Combat Common Soccer Injuries
So, if soccer players at all levels are constantly at high risk for sidelining injuries due to the nature of their sport, what can they do to prevent them?
First and foremost, athletes (as well as parents and coaches) need to put their body’s needs first, and if/when injury occurs, they need to respect the amount of time it needs for proper healing and recovery. This shift in mindset alone will help players avoid not only re-injury, but also future injuries and chronic pain down the road.
Simply put, playing through the pain is no longer an acceptable excuse (unless you don’t care about chronic injury, early arthritis and a host of other health issues later in life.) While athletes in demanding sports will always be at risk for injury, here are a few steps you can take to get started on your path to preventing overuse injuries and chronic pain:
- Always, always warm up. Do a proper, structured dynamic warm up program, such as the FIFA 11+ Program, before every practice and game. A dynamic warm up includes exercises that mimic the movements you’ll actually be doing while playing soccer, which properly preps your body to perform.
- Focus on exercises that target and build stability in the most vulnerable areas of soccer players, i.e. the ankles, foot, knees, and hips. Some good exercises for this are single leg balance drills, lateral walks with resistance bands, heel raises, and hip series exercises targeting lateral hip stabilizers.
- Build a good support system. Find a good coach, physical therapist, certified athletic trainer, and/or other sport professionals to assist you with injury prevention techniques. These people should share your focus on listening to your body, and should never push you to return to sport before your body is properly healed.
- Make sure to stretch and foam roll after every practice, training session, or game. Click to download the Rausch Physical Therapy & Sports Performance Foam Roll Routine poster.
- Emphasize proper form. Always focus on form when performing sport-specific movements (eg. long kicks, corners, short kicks, penalties, passing, etc.) They may feel second-nature after many years playing, but when you get sloppy you risk re-injury.
- Do NOT depend on braces, taping, etc. long term to “fix” an injury. While these bracing methods are good for prevention and short-term protection, ultimately you are treating the symptoms of the problem, not the cause. Visit a physical therapist who can use manual therapy to actually rehab traumatic and chronic injuries, as well as create an exercise program to strengthen your weak areas to keep you off their table and on the field.
- Listen to your body! Pain is not the only indicator for injury. Instability, weakness, poor-tissue mobility, etc. can all indicate that an athlete is NOT ready to return to the pitch.
 Lyndsay DeFilippo PT, DPT, CKTP received her Doctorate of Physical Therapy from New York University in 2010. She’s a Graston Practitioner and a Certified Kinesiotaping Practitioner. Lyndsay looks at each injury as a constantly changing puzzle, which is only solved when her patient returns to what s/he loves doing. She enjoys helping with the full recovery process, which includes providing the education, tools and fundamentals to prevent re-injury and the potential for new injuries.
Click to learn more about Lyndsay and our other physical therapists »
Proper Lower-Body Alignment for Maximum Pedal Power

Are poor cycling mechanics effecting your power output? Dustin shares his thoughts on proper biomechanics on the bike, as well as the single exercise you need to ensure all your hard work is translating to optimum pedal power.

BY DUSTIN HANCOCK, DPT, RAUSCH PHYSICAL THERAPY
Are poor cycling mechanics robbing you of your precious pedal power? You can train long and hard to improve your performance on the bike, but if your body alignment is off, you’re putting yourself at risk for both injury and power loss.
For cyclists, proper biomechanical alignment in these three lower extremities is the key to not only avoiding injury, but also to increasing your power output levels.
Hips
As the powerhouse of the body, the hips are an important aspect of a cyclist’s biomechanics. There are several common issues cyclists face in this area, such as overuse of the quadriceps muscles while pedaling, as well as tightening of the hip flexor from sitting for too many hours in a day.
Tight hip flexors inhibit the most important hip extensor muscle, the gluteus maximus, while a lack of full flexion results in compensations at the spine, which can cause joint stress, compression of the discs, lower back pain, and saddle-related pelvic floor dysfunctions.
The “best” hip position while riding is different for each person, which is why it’s important to get a professional evaluation to figure out the natural shape of your hips (Q-angle) and ideal riding style. However, the general rule is to imagine a plumb line from the hip through the middle of the knee and finishing between your second and third toes. Since everyone is different in shape and size, the best position is usually the most natural feeling to you; so, hop on a trainer, close your eyes, and feel to the path of least resistance.
Knees
Think of your legs as pistons; as they attack a hill, they need to keep the power straight and consistent to operate effectively. As a physical therapist, I always perform a frontal plane exam on cycling patients to check that their knees are tracking correctly, as poor alignment causes power loss and puts you at risk for injury.
My frontal plane exam simply consists of having my patients stand in front of me and perform a Single Leg Squat. The squat simulates the cyclist’s foot position, and it shows me what my patient feels is comfortable. In my evaluation, I look to see if the feet are turned out, which results in a collapsed arch and can cause a deviation or torsion strain at the knee. I also check if the hips move backwards first when the patient squats, indicating it’s a gluteal-dominate movement, so the trunk of the body can stay controlled, which ensures core/hip stability. The knee should not go past the toes, and I also advocate for the shins staying as vertical as possible to take stress off the ACL—the most important ligament in the knee.
You can perform a frontal plane exam yourself at home by performing a Single Leg Squat in front of a mirror. As you squat, check that you’re keeping the knee tracking wherever the second and third toes are pointed; this ensures all your power is being transferred to the bike.
Ankles
Your ankle joint positioning is important to efficiently transfer the power into the pedal without any leaks in the system. There are generally three postures of cyclists—toe-down (stabbers), neutral/horizontal, and heel dropped—each of which has some pros and cons. The toe-down posture is designed for flexibility or compliance to the surface beneath, while the neutral/horizontal and heel-dropped ankle postures are understood to derive more power.
Heel Drop: Good
The human body is structurally designed to allow us to use muscles as pulleys and produce power to accelerate our body. When the ankle is in the heel-dropped posture, the ankle is positioned so that you have the least power transfer loss; this is known as a “closed pack” position” in medical terms, meaning the shape of the bones lock into place and all ligaments are in tension. This stiff ankle joint position allows every watt to transfer into the pedal.
Toe Down: Not So Good
If your toe is pointed down in the stabbing posture, typically you’ll lose power on the downstroke, as the ankle will suck up some watts in this “softer” ankle joint position. The analogy that helps the understanding of this concept is to think, “What is more efficient when climbing a steep hill, a bike with full suspension opened up in the rear, or a hard tail or lock out in the rear?” The full suspension example above is like having the stabbing ankle posture (too soft and springy) and as you power stroke up the hill you are leaking power.
Again, each individual is different, so I say the most comfortable, relaxed ankle posture is what’s best for you. However, biomechanically speaking, you may have an advantage dropping the heels during the power stroke to ensure all the power and hard work goes where you want it to.
Prescription for a Quick Fix
There is one particular exercise cyclists can do off the bike to ensure their lower-body biomechanics stay in check: the Single-Leg Squat on an unstable surface (such as a BOSU® Ball*.)
Correct Single-Leg Squat Mechanics:
- Hips move back first
- Toes stay relaxed while ankle stays relatively flat to the ground
- The motion down is controlled and super slow (at least six seconds) with good alignment
- Finish strong by going back up fast, squeezing the buttock at the top
Start with 10 to 15 reps focused on form, then work up to three sets of 10 to 15 reps, two to three times a week.
*If you don’t have a BOSU®, use a pillow as the unstable surface.
Applying the PAP Theory for MTB
To make this “quick fix” exercise more sport-specific, mountain bikers can apply the Post-Activation Potential (PAP) theory to help unleash greater potential power gains for exploding up those steeps hills.
PAP is a high-level training concept that combines heavy-resistance strength training with explosive plyometric, sport-specific movements. The concept of “explosion timing” and the focus on quality alignment under heavy loads is at the foundation of each movement.
[vsw id=”QmIhTkEQFsA” source=”youtube” width=”425″ height=”344″ autoplay=”yes”]
Single Leg Squat Using PAP:
- Stand on one leg. Squat in a controlled and slow downward motion (five to six seconds down) with a focus on good alignment.
- Start the upward motion slowly for one to two seconds, then explode to finish.
Applying the PAP theory to a Single Leg Squat—with a two-second delayed, explosive movement—will not only improve your cycling biomechanics, but also your climbs.
 Dustin Hancock, DPT graduated from San Diego State University with a bachelor’s degree in kinesiology/nutrition. He went on to receive his doctorate in physical therapy in 2011 from University of St. Augustine, and began his career at Rausch Physical Therapy and Sports Performance in 2012. As a snowboarder and mountain bike enthusiast, Dustin specializes in treating extreme sport athletes. As a physical therapist, Dustin says he looks forward to being a companion every step of the way on his patient’s path to recovery.
Click to learn more about Dustin and our other physical therapists »