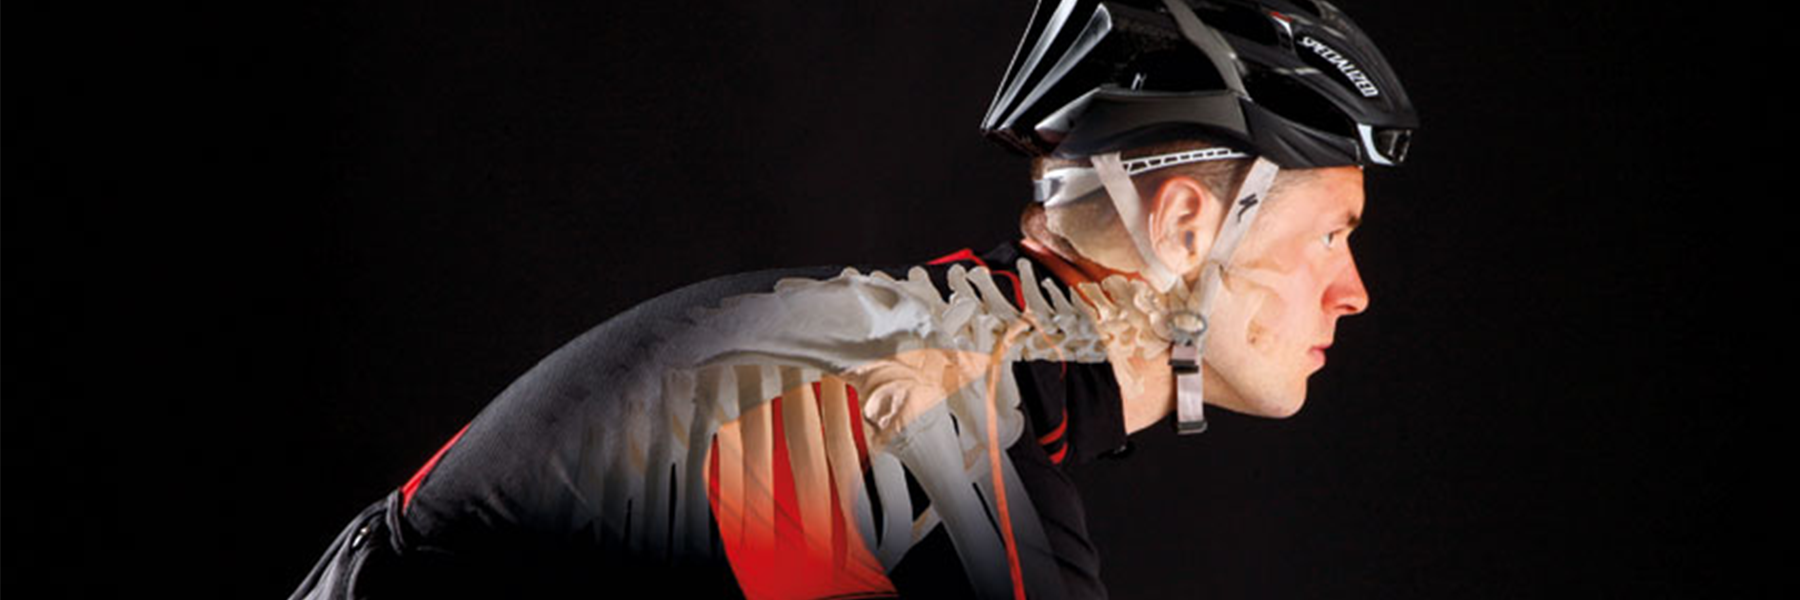
Don’t let cycling be a pain in the neck. DPT Max Biessmann shares his three quick fixes for helping alleviate and prevent pain, aches and soreness in the upper back and neck while on your bike.
 BY MAX BIESSMANN, DPT, RAUSCH PHYSICAL THERAPY
USAT LEVEL I COACH, ASCA LEVEL I COACH, USA SWIMMING COACH
Approximately 66 million Americans enjoy cycling for sport, and why wouldn’t they! It’s a great workout, social, and is perfect for cross training or for people with chronic injuries because of the reduced impact cycling has on the body. Unfortunately, many cyclists find themselves struggling with pain or discomfort, whether it’s the inability to get comfortable on the saddle or one of the most common complaints: neck/upper back pain and discomfort. Many people complain of pain ranging from soreness and aching, to numbness or tingling in their arms and hands, to sharp shooting pains in the neck and arms.
What Causes Neck Pain While Cycling
While cycling, your neck is in an extended position, doing its best to hold up your rather heavy head (the average head is 10 to 11 lbs.) Not only must your muscles do all the heavy lifting since the spine is unable to support the weight directly, but this also causes a closing down of the facet joints in your vertebrae. This constant closing can cause nerve irritation and excessive wear and tear on the joints.
As with anything you do, the longer you spend in a specific position, the more your body adapts to maintain that position. So, when you’re spending hours and hours per day hunched forward at your desk, in front of a laptop, looking at your phone, and on your bike, the more your body adapts to this position. This can cause the common posture dysfunction upper crossed syndrome, which is when your neck extenders (the muscles you use to look up) get short and tight, while the deep neck flexors (the muscles that tuck your chin down) get stretched out and relatively weakened.
Three Easy Ways to Avoid Neck Pain While Cycling
This combination of muscular imbalances and decreased nerve root space can lead to any combination of symptoms from chronic aching to shooting pains. Luckily, there are several very simple things you can do to decrease these symptoms if you already have them or prevent them from starting in the first place.
#1: Check how you’re riding your bike
- Make sure your elbows are slightly bent in order to allow your arms to absorb vibrations and impacts from the road or trail.
- Your hands should be snugly gripping the bars or hoods, but still staying relaxed in order to allow proper blood flow.
- Shoulders should be relaxed and loose to help absorb shocks your elbows can’t absorb alone.
- Make sure to look forward with your eyes as well as your neck in order to try and reduce some of the extension in your neck.
- Check your helmet; it may be sitting too low on your forehead and obstructing your view causing you to look up more.
Remember, while cycling the only part of your body that should be working really hard is your legs; make sure you’re keeping your neck, shoulders and arms in a relaxed ready to go state. If you don’t feel you’re moving correctly on the bike, schedule a Bike Right session and have a physical therapist assess how you’re moving on your bike; having someone else watch you ride can help isolate the specific movement deviations and bad habits you may have developed over time.
#2: Work your body
To help prevent some of the adaptive muscle shortening and nerve compression from cycling, try these 10 simple exercises and stretches. These are also great exercises to do if you work at a desk a lot!
Stretches/Mobility:
- Pec Stretch: Stand in a doorway and put your arms out to either side and slowly lean forward until you feel a stretch through the front of your chest into your armpit. Play with the height of your arms above, at or below your shoulders to get the various fibers of the muscle. Do 2-3x for about 30 sec each.
- Upper Trap/Scalene: Sitting in a chair, grab the bottom of the chair and side-bend away from that side. Look up for a scalene stretch and look down for a upper trap stretch. Do 2-3x for about 30 sec each side.
- Neck Extensors: While sitting, gently pull the back of your head forward while gently pushing in on your chin till you feel a stretch just at the base of your skull. Don’t crank on this one, take it easy on your jaw, it should be a fairly gentle stretch. Do 2-3x for about 30 sec.
- Pec Release: Take a tennis or lacrosse ball and place it between your chest, near the front of your armpit, and the wall. Roll the ball around until you find any tender spots and spend about 10-20 sec massaging that area. Spend about 1 min on each side
- Upper Trap Release: Place a tennis or lacrosse ball in pillow case and lean against the ball and a wall anywhere between your shoulder blade and spine up through the base of your neck. Massage out any tender or sore spots for about 10-20 sec per area; spend approximately 1 min on each side
- Foam Roll Extensions: In order to take strain off of the joints of your neck make sure your upper back can move well. Lie across a foam roller on your back with your arms supporting your head and your hips on the ground and lean back to extend your upper back. Start about halfway up your back and continue up until just short of your neck. Do about 5 extensions at each spot moving the foam roller up about an inch each time.
- Towel Rotations: Wrap a small hand towel or pillowcase around the back of your neck, grab the ends with the opposite hands. Pull down to anchor the towel with one hand and pull the towel across your chin as you rotate your head, when you get to the end of your range add a little bit of overpressure from the towel to help stretch into the movement.
- Thread the needle: Begin in quadruped position (on hands and knees), place foam roll on the outside of one arm. Once there, reach with the arm furthest away from foam roll under the body to make contact on top of foam roll and roll through, rotating upper spine.
Strengthening:
- Chin Tucks: Begin by lying flat on your back with a soft pillow under your head. First gently press the back of your head into the pillow as you tuck your chin in, as if you’re making a double chin, hold for 10 seconds then relax, repeat 10-20 times. If this is easy practice against a wall while doing a wall sit.
- I’s, T’s and Y’s: Lying flat on your stomach, across a swiss ball or end of bed or couch, place your hands at your side (I) out to the side at shoulder height with thumbs up (T’s) or above your head and out to the side (Y’s). The focus of the movement is to move your shoulder blades not so much your arms, squeeze your shoulder blades together and squeeze for 10-15 seconds and relax, repeat 10-20x in each position. The Y’s will be the hardest so start with less reps here and advance as it becomes easier. While lying on your stomach focus on good posture through your entire spine all the way to the top of your head.
#3: Get a Bike Fit
If none of these “quick fixes” seem to help, it may be time to reassess your bike fit. First off, were you ever fit? If so, how long ago? Your body changes, so you should really get a bike fit every year or so.
There are many aspects of the bike fit that can affect how much strain and what kind of strain is being placed on your neck and upper back:
- The most obvious is your handlebar height; the lower they are the more you have to look forward to see (looking at you, triathletes!)
- The length of your bike, the distance between saddle to handlebar, can also affect how much you have to reach and how you carry your weight through your arms.
- The width of your handlebars may be too wide or to narrow, which can make it difficult for your arms to rest or settle in a comfortable position.
- Triathletes, look at both bullhorn and aerobar pad positions.
- The angle of your hoods on a road bike might pitch the angle of your wrists and affect how you carry your weight through your arms.
- The tilt of your saddle can cause you to be unbalanced between handlebars and saddle.
- Nikki at Rock N’ Road Cyclery (Laguna Niguel)
- Dave Jordaan – Cyber Cycle Coach (Irvine)
- Rick Schultz – Bike Religion (Dana Point)
Conclusion
Don’t let neck pain stop you from enjoying the sport you love. By making a few quick adjustments and getting a professional bike fit, you can continue to ride hard and ride long for many years to come.
 Max Biessmann, DPT is a licensed physical therapist at Rausch Physical Therapy & Sports Performance. He received his Doctorate of Physical Therapy degree at the University of St. Augustine, San Marcos in 2016 and started his career at Rausch PT. Max is passionate about helping people achieve their goals through physical therapy and innovative rehab technologies. As the Endurance Sports PT, Max says he’s lucky to be able to combine his professional coaching experience and PT knowledge to help his patients achieve their personal bests in sports and daily life.
Learn more about Max and our other physical therapists »
The Four-Step (Dry) Swim Warm Up
While most triathletes focus on training for the run and bike portion of their race, it’s actually the swim that can make or break your day. A proper warm up is key to success—with or without being able to get into the water before your start.
 BY MAX BIESSMANN, DPT, RAUSCH PHYSICAL THERAPY
USAT LEVEL I COACH, ASCA LEVEL I COACH, USA SWIMMING COACH
It’s no secret that triathlon is a very difficult sport to find the time to train. Not only do you have to train a large volume to build the proper endurance, but you also have to find the time to train in three different disciplines.
Running and cycling share the most in common, as both are leg-driven sports and make up the majority of your race, and because of this, many triathletes will focus most of their time and effort into training for these two sports. However, I believe that it’s the swim portion of triathlon that’s the most important; a solid swim starts your day off right and sets you up for success for the rest of your event. As the saying goes, “You can’t win the race in the swim, but you can lose it.”
Beating the Rush
As the first of the three events on race day, the swim has an undoubtedly hectic beginning. Everyone is still fresh, nervous, and pumping with adrenaline, which makes for a fast and chaotic start to your day. Still, if you’re looking to place well or find the feet of the right person, it’s important to be able to handle this initial energy surge and settle into your pace after the first 300 to 500 meters.
A proper warm up is crucial to combatting this high-intensity rush so you can avoid overloading your body with lactic acid or excessively tapping into your anaerobic system, which is especially important since you’re about to do an activity with limited oxygen availability.
Fish Out of Water
Most events allow racers to get into the water before start time to warm up their arms and shoulders, get their wetsuit to “settle” onto the body, and acclimate to the water temp, which is especially helpful for those of us racing in So Cal in the cold Pacific Ocean. However, there are several very popular races on the IRONMAN circuit, such as Oceanside 70.3 or St George 70.3, that make it challenging or near impossible to get into the water before the start of the race due to race logistics.
While you should do your best to always get in the water before a race, a “dry swim” warm up using theraband tubing is another great way to get your arms and shoulders ready for the load of the swim. If for whatever reason you can’t get in the water before your race start (or even for your weekly swim workout) this “Dry Swim” Warm Up will quickly activate the stabilizing muscles of the shoulder complex to prepare you to swim at your best.
Four Steps, 10 Exercises: The “Dry Swim” Warm Up
In order to complete this warm up you’ll need a relatively long (3 to 4 ft.) piece of surgical tubing or theraband. Light resistance (green or red theraband) is best, as you’re not trying to load up the muscles or increase strength; this is just get the muscles moving and warmed up. The key is to focus on the speed and quality of the movement.
Step 1 – Complete your usual warm up or pre-race routine
- Start with your usual jog or dynamic stretch warm up to get your lower body and cardiovascular system ready, as these will carry you throughout the entire day.
- Put on your wetsuit so you can check in the morning clothes bags and be ready to go at any point.
- Don’t forget your body glide or lubricant for neck, underarms, etc.!
Step 2 – Get your shoulders ready to move
Begin with a few arm circles, forwards and backwards, both single and double arms. This is a great time to check and adjust the fit of your suit on the neck and shoulders. Make sure to move your whole shoulder complex, including the scapula. Focus on relaxed arms, generating the movement from the trunk and shoulders and preparing the joints for movement.
Then, go on to speed skaters. This involves bending at the waist and swing your arms side to side with a bit of thoracic spine rotation—another key point in being able to swim well. Speed skaters also help by adding a dynamic stretch to your pec muscles and anterior chest. Speed skaters can also be done standing, known as helicopters.
Do each stretch for about 15-30 seconds.
Step 3 – Waking up the shoulder stabilizers
Time to break out the theraband! A light-resistance piece of theraband or surgical tubing is all you need to wake up the muscles of the rotator cuff and scapular stabilizers and prepare your shoulder joint for the stresses that will be applied during the swim stroke.
Perform 20 to 30 reps or 30 seconds per exercise.
[one_half]
Internal/External rotations with arm at side
Start with your arm at your side with the elbow bent 90 degrees, then depress and squeeze the scapulas together. For external rotations, move your hand away from the body; for internal, move the hand towards the body.
[/one_half]
[one_half_last]
Rows
Standing facing the band with elbows bent about 90 degrees, squeeze the scapulas together and bring the elbows straight back. Make sure to keep the scapulas anchored and depressed the entire time.
[/one_half_last]
[one_half]
Flexion/Scaption Raises
Standing on the band, lift the band up to shoulder height with minimal hiking of the shoulder. Flexion is directly in front of the shoulder, and scaption is at about 45 degrees to the side.
[/one_half]
[one_half_last]
Standing Ys
With the band looped around a pole, start with both arms crossed and at the opposite hip. While squeezing the scapulas together and keeping your back straight, bring your arms up and out to form a Y shape above your head.
[/one_half_last]
Step 4 – Waking up the primary swim movers
The final step is to warm up the primary swim muscle: the latissimus dorsi muscle. This is the most swim-specific part of your warm up, and it’s a great time to work on the early, high-elbow arm position that’s critical for generating a good catch while swimming. As you move through these next four exercises, focus on the timing of the stroke pulls; start the movement slower and increase the speed through the back of the pull—just as you would with a normal stroke—then control the return (don’t just let the arm snap back to the front.)
Spend about one minute on each exercise; repeat until you’re warmed up and ready to go.
[one_half]
Standing Swimmers
Stand facing a pole with scapulas depressed and controlled pull from about shoulder height down to your hips. Your arms should move in a direct line with shoulders and hips.
[/one_half]
[one_half_last]
Front Quadrant Pulls
Bent forward with an active core and arms out in front of the shoulders, begin a stroke with a good high-elbow position and pull back until about the shoulder. Focus on coupling scapular depression and elbow flexion in order to wake up and perfect the timing of the arm engaging with the scapula moving.
[/one_half_last]
[one_half]
Butterfly Pulls
Both arms together do a front quadrant pull, but continue the motion all the way back to the hips. Make sure focus on accelerating the pull from shoulder to hip. Bring arms back out to the front underneath the body in a controlled fashion. Keep the arms controlled while recovering and don’t let them elevate above the shoulder. Do not bounce the whole body; focus on isolating the arms.
[/one_half]
[one_half_last]
Freestyle Pulls
Same as butterfly pulls, but one arm at a time. Work on adding a little thoracic rotation. Do the first few with an under-the-body recovery, then you can advance to a more freestyle-like recovery—just be careful of pulling on the shoulder while it’s coming up behind the hip.
[/one_half_last]
Conclusion
This warm up is a great way to help prepare for the swim—with or without being able to get into the water. Make sure to play around with the timing before swimming during normal training; some races will make you wait around a while in a chute before swim starts. Also make the routine your own, you might benefit from more time doing double arm butterfly pulls to help wake up your lats and primary swimmers, or more time with speed skaters and freestyles in order to help open up your stiff thoracic spine. It is still important to get into the water as soon as possible to try and swim if possible, get water into your wetsuit, and acclimate to the temperature of the water. At the end of the day, make sure you practice this and are comfortable doing it before your normal swim training sessions: never try anything new on race day!
Have fun out at the races. Each triathlon is an adventure, don’t lose sight of the journey by only thinking of the destination.
 Max Biessmann, DPT is a licensed physical therapist at Rausch Physical Therapy & Sports Performance. He received his Doctorate of Physical Therapy degree at the University of St. Augustine, San Marcos in 2016 and started his career at Rausch PT. Max is passionate about helping people achieve their goals through physical therapy and innovative rehab technologies. As the Endurance Sports PT, Max says he’s lucky to be able to combine his professional coaching experience and PT knowledge to help his patients achieve their personal bests in sports and daily life.
Learn more about Max and our other physical therapists »


What our patients are saying

Crista E.
Lynne B.
Everything Rausch has recommended involving treatment for my condition has been appropriate and top-notch!
Allison B.
Michael M.
Vincent M.
Deborah R.
Robert V
Valeria R.
Stay Connected
Sign up to receive monthly specials, events, and expert tips & tricks.