Blog

Rausch PT Gets You There

[one_half]

Justin: "Repping proper running mechanics and warmer weather all the way on the East Coast at the NYU Physical Therapy Annual 5k."
Justin: “Repping proper running mechanics and warmer weather all the way on the East Coast at the NYU Physical Therapy Annual 5k.”

[/one_half][one_half_last]

Kevin: "From the top at 11,053 ft to recovery from the surgery table... This team gets it DONE!"
Kevin: “From the top at 11,053 ft to recovery from the surgery table… This team gets it DONE!”

[/one_half_last]

As much as we love seeing our clients in the clinic, nothing brings us more joy than seeing them out and back to doing what they love. Whether your goal is returning to the golf course, racing your first 5k, or trying to qualify for Kona, we’re here to get you there!

Where has Rausch Physical Therapy & Sports Performance taken YOU? Share your Rausch PT #triumph photos on FacebookTwitter and Instagram, and you could be featured on our page!

Don’t forget to tag #RauschPT #getyouthere

Six Ways to Avoid Painful “Text Neck”


Your screen addiction isn’t just straining your eyes and relationships; over time, your neck muscles can become stretched out and weakened while others become tight and painful as they struggle to stabilize your head in front of your body. Poor posture due to hours of mindless scrolling and tapping could be at the root of the chronic soreness and pain in your head, neck, shoulders, and back. PT Ashley Heller shares her six tips for avoiding the painful condition “Text Neck.”

Ashley-Blog
BY ASHLEY HELLER, PT, MPT, RAUSCH PHYSICAL THERAPY

I constantly notice patients looking down at their phones—texting while in the waiting room, scrolling through Instagram while on the table, checking their work calendar to schedule their next appointment. These days, most everybody relies on their smartphone to stay connected to the world, and almost everyone is guilty of looking down at our phones.

While there’s no question that having technology at our fingertips is entertaining and convenient, it can also be a pain in the neck—literally. So, what can we do to prevent the pain associated with the dreaded “Text Neck?”

What is “Text Neck?”

What many people fail to realize is that repetitive or habitual postures over time related to texting, reading, and working on the computer may lead to long-term effects on the way we feel. Over time, the neck muscles become stretched out and weakened while others become tight and painful as they struggle to stabilize your head in front of your body. Poor posture over a prolonged period of time can lead to postural dysfunction resulting in chronic soreness and pain in your head, neck, shoulders, and back.
[one_half]

What’s the science?

  • Postural syndrome occurs when prolonged stress is placed on the neck
  • The average human head weighs 10-12 pounds in a neutral position
  • The further bent forward your head is, the more weight your neck has to support:
    • 15º =  27 pounds
    • 30º = 40 pounds
    • 45º = 49 pounds
    • 60º = 60 pounds

[/one_half][one_half_last]

Symptoms of Text Neck

  • Headaches or migraines
  • Pain in neck and or between the shoulder blades
  • Numbness or tingling down the arm
  • Shoulder pain

[/one_half_last]

Long-term effects of Text Neck

Prolonged posture strains your neck muscles and cervical facet joints, resulting in soreness and inflammation in that area. It also flattens the normal curve of your neck, which can lead to:

  • Headaches
  • Nerve pain in neck or arms
  • Disc degeneration or herniations
  • Arthritis resulting in neck stiffness, as well as arthritis in the neck joints

Text Neck also can also cause a rounded shoulders posture, which can affect the mechanics of the shoulder and may result in shoulder impingement. You’re also more susceptible to a condition called Upper Crossed Syndrome, which occurs when the muscles in the neck, shoulders, and chest become deformed causing things like a hunched back or chronic shoulder, upper back and neck pain.

Six ways to combat and avoid Text Neck

The good news is that it’s not too late to make changes to undo any damage your screen addiction may be inflicting on your body. These tips can also apply while reading or working on your computer or tablet.

    1. Be aware of your posture. Pay attention to the way you are sitting or standing and how long you have been in that position.
    2. Listen to your body. When you feel neck pain starting, correct your posture immediately by getting out of a slumped position, then find a neutral spine posture by sitting upright while aligning your ears with your shoulders.
    3. Bring your phone up to eye level to reduce strain to your neck while you are texting.


  1. Text with your arms supported to decrease strain to the neck.
  2. Don’t stay in one position for too long. You now know that prolonged postures can lead to muscle strains, so get up and move around! You should also use a foam roll, tennis ball or lacrosse ball to decrease tissue tension in your upper back.
  3. See a physical therapist. If you’re already feeling the painful symptoms of Text Neck in your neck, upper back or shoulders, schedule an appointment with a physical therapist. We’re experts in musculoskeletal dysfunction, and we can create a specific plan of care combining manual therapy and therapeutic exercises to help you find relief and change your texting habits for good.

PT-Headshots-AshleyAshley Heller, MPT is a licensed physical therapist at Rausch Physical Therapy & Sports Performance. She received her Masters of Physical Therapy degree at California State University, Long Beach and is passionate about working with patients with shoulder, knee and ankle injuries. With background in orthopedic-related injuries and post-operative rehabilitation, Ashley believes that the combination of manual therapy and personalized therapeutic exercise program is vital to recovery. Known as the Water Sports PT, Ashley says her goal is to help her patients better understand their injuries and the plan for their road to recovery.

Click to learn more about Ashley and our other physical therapists »
Let’s talk! We are here to help. Give us a call for an initial evaluation and assessment. We would love to meet you.

Did you know there’s no prescription needed from a doctor to see us – but we will communicate your progress and treatment to your doctor if you’d like us too!

(949) 276-5401

RauschPT

Disclaimer — All the information that you find on our blogs and social media pages are for informational purposes only and are not intended to be used as your personal professional diagnosis, or treatment. Come and see us for your excellent, personalized care! https://staging.rauschpt.net/

October Workshop: Train & Recover Like an Olympian


Train & Recover Like an Olympian

Lessons from the 2016 Rio Olympic Games

[framedbox][one_third]

When

Wednesday, October 19
7 – 8:30 PM

[/one_third][one_third]

Where

RauschPT-Logo-2015

28202 Cabot Rd. Suite 150
Laguna Niguel, CA 92677

[/one_third][one_third_last]

Cost

$15 per person

[button link=”https://clients.mindbodyonline.com/classic/ws?studioid=18756&stype=-106&sView=day&date=10/19/16″ size=”small” color=”blue” align=”center” target=”_blank” ]SIGN UP NOW[/button]

[/one_third_last][/framedbox]

Every four years, people around the world tune in to the Summer Olympics to cheer on their country and marvel at jaw-dropping feats of athleticism. Between the interest in #RoadtoRio stories and the constant media coverage of those purple spots, it’s clear us mere mortals are obsessed with learning about Olympians and how they’re able to do what they do.

Click to enlargeAt the October Wellness Workshop, Kathy Flippin, owner of Dynamic Touch Massage and massage therapist to Team USA Swimming, will give participants a behind-the-scenes look at the Olympic Games and reveal what she learned while helping the likes of Michael Phelps, Katie Ledecky and the entire historic USA Swimming team recover in Rio.

Topics include:

  • A behind-the-scenes look at the Rio Olympics
  • Harnessing the mindset of an Olympic athlete
  • “The Peak, the Taper, and the Secret Sauce”: Cupping and other “weird” recovery methods that helped USA Swimming win 33 medals
  • How you can train and recover like an Olympian

So whether your goal is to PR at your next race or Tokyo 2020, here’s your chance to learn what it takes to take home the gold!

 [button link=”https://clients.mindbodyonline.com/classic/ws?studioid=18756&stype=-106&sView=day&date=10/19/16″ size=”small” color=”blue” align=”center” target=”_blank” ]SIGN UP NOW[/button]


How to Keep Injuries from Killing Your Big League Dreams


Injury prevention is a top concern for many young players whose goals of playing college or professional baseball rely on them staying healthy. “The Baseball PT” Jonathan Meltzer, DPT shares his four tips for proper arm and body care and maintenance to help youth overhead athletes achieve a long, healthy career.

JM-BLOG
BY JONATHAN MELTZER, DPT, RAUSCH PHYSICAL THERAPY

So, you want to play baseball at the next level? Whether that means making a college team or making it to the show, the opportunities to play at a higher level are there for the taking, but it requires significant diligence, dedication and talent. It also takes training and—most importantly—you have to stay healthy.

One of the biggest big league dream killers is injury. You see it time and again; a high school player ignores an injury he suffered playing club ball as a kid, and now when it’s time for scouts and coaches to evaluate his skill, he’s stuck in the dugout on the disabled list.

As a physical therapist, nothing makes me prouder than when I help a young ballplayer rehabilitate from a potentially career-ending injury, and he then goes on to achieve his goal of playing college baseball. By taking care of your body and implementing a specific strength training program, injuries are much less likely to occur, and you can greatly expand your career longevity.

Here are four tips for getting your arm and body in the most efficient shape possible so that injuries don’t keep you from playing ball at the next level.

#1 – Be Honest

First and foremost, you have to be honest about your symptoms. Ask yourself, “Do I feel pain, discomfort, or soreness anywhere in my body that doesn’t seem to go away?” Answering yourself honestly and being able to accept that something “just doesn’t feel right” is the first step in injury prevention.

If you do notice any minor aches, pains or soreness that doesn’t seem to go away, you need to get it checked out by your physical therapist or sports physician. For example, as “the Baseball PT,” I always perform a full biomechanical analysis and assessment of the entire “baseball body” when a player comes to see me about some “minor” pain. Trust me when I say something small will usually develop into a more serious injury because of the repetitive nature of baseball mechanics (i.e. pitching, throwing and hitting.)

FOR PARENTS/COACHES: If your player is trying to be honest with you about pain, LISTEN TO HIM. I cannot tell you how many times an overzealous parent or coach will push their kid to play through pain and soreness because a scout might be in the stands, only to cause permanent damage that ends their kid’s baseball career while he’s still a teenager.


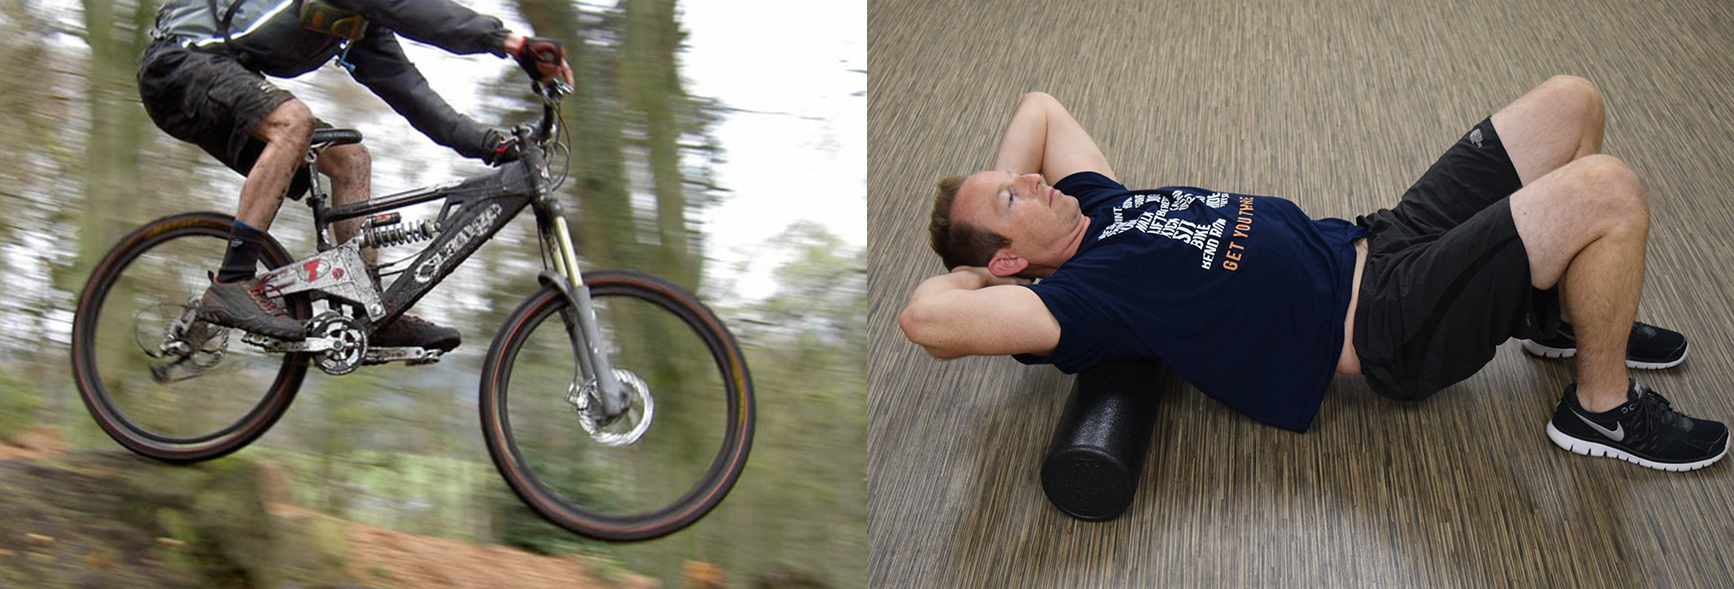
#2 – Take Care of Your Tissues

Once recognizing some ache, pain or soreness, you need to start preventative care with consistent soft tissue work. For this, I recommend every one of my athletes to get a lacrosse ball or baseball. You can either lay or stand with the ball pressed against your back/shoulder and some hard surface. Any sore or tender spots you find means there are restrictions there that must be worked out before and after every practice and game. Another great soft-tissue mobilization tool–particularly for your upper back and lats–is a foam roller. Again, you should foam roll before and after every practice and game to keep the rotational component of your body loose.

#3 – Stretch the Proper Way

Take note because this is very important: we DO NOT want to static stretch prior to performance. When you static stretch (e.g. hold arm across body, pec stretch holding on to fence, hamstring stretch, etc.) all you’re doing is tricking your brain into thinking your tissues are lengthening (i.e. getting loose) when in reality, they’re not. Your brain has told your body it’s warmed up and ready to go, but actually the tissue is still stiff and not properly prepared for action, which is what can lead to injury. Static stretching also negatively effects your performance, as research shows that it leads to a nine percent decrease in strength for up to an hour afterwards (obviously not ideal before a game.)

Instead, before every practice and game you need to perform a dynamic warm up, which mimics the movements you’ll actually be doing while playing ball, such as active wrist movements, dynamic hugs, and throwing position rotation.

For a simple dynamic stretching program you can implement into your warm up routine today, watch my video Dynamic Baseball Warm Up (Part 1): Stretching:


#4 – Build Entire-Body Strength

Finally, the last piece to get us to the next level and help prevent injuries is a proper strength training program. However, in this case* I’m not just talking about strengthening the arm, but rather the entire body. I really can’t emphasize enough how important it is for baseball players to work on their shoulder stabilizers to improve their back, core and lower-half strength, as well as balance.

To view my four favorite stabilization and strength training exercises for preventing injuries, check out my blog “4 Strength Exercises All Baseball Players Should Add to Their Training Program.”

[framedbox]*PLEASE NOTE that my Dynamic Baseball Warm Up mentioned in #3 also includes an arm strength exercise program, to be performed prior to every practice and game to dynamically warm up the arm before use. Stay tuned for part two of the above video, “Dynamic Baseball Warm Up (Part 2): ARM STRENGTH & BANDS,” coming soon![/framedbox]

So, as you continue to put in the work to achieve your dream of playing baseball at the next level, just remember that consistency is key. Professional athletes are all known for their consistent drive and dedication, and with that dedication comes an intense focus on daily body health maintenance. The fact is that if you’re consistent with your daily recovery routine and if you start listening to your body, you will perform better, and ultimately your shot at playing baseball at the next level is as good as anyone’s.


StaffHeadshot-JonJonathan Meltzer graduated from the University of Redlands with a bachelor of arts in biology and a minor in physical education. Following graduation, Jonathan discovered his passion for physical therapy while working as a Physical Therapy Aide. After graduating top of his class from Loma Linda University in 2012 with a Doctorate in Physical Therapy, Jonathan began his career at Rausch Physical Therapy and Sports Performance. Jonathan’s goals are to identify limitations and treat his patients with the most recent and innovative techniques in order to maximize functional independence and obtain his patients’ individual goals.

Click to learn more about Jonathan and our other physical therapists »


Best Foam Rolling Routine for Mountain Bikers

Blog-Dustin
BY DUSTIN HANCOCK, DPT, RAUSCH PHYSICAL THERAPY

This post has an accompanying article, “This Soft-Tissue Maintenance Routine Will Keep You On Your Bike Longer.” Click here to read it now on the Over the Hump blog.

As mountain bikers, we put our bodies through the ringer. Introducing a soft-tissue mobilization technique like foam rolling can help you avoid limiting aches and pains so you can stay on the bike longer, train harder, and reduce your recovery time.

Recovery and maintenance programs aren’t always convenient, but I personally make it a point to implement them in my training to ensure I get to join the riding group every weekend and race stronger at Over the Hump. The daily grind takes a big toll on our bodies and will cause imbalances, whether it’s from poor posture at your desk, lack of cross training or focusing too much on strength training. This is why it’s critical for all MTB riders to actively pursue some form of mobility maintenance routine to keep their bodies balanced and their seat on the trails.

Best Foam Rolling Routines for Mountain Bikers

When you feel sore after you train hard or go for a long ride, it’s because your muscles are literally tearing apart to restructure fiber alignment for greater tolerance to that stress. This microfiber tearing will cause a formation of more cross-links so that you become stronger (Good!) However, if you don’t then work on those specific tissues after training—say, with a foam roller—they’ll become glued down in a mal-aligned direction, and you’ll lose mobility (Bad.)

The foam roller is one of my favorite tools for working out your muscle and tissue on a routine basis; it’s cheap, easy, and you can do it yourself. Ideally, you should spend time working out the tissues that are tight for five to 10 minutes daily, or until you feel about a 50% reduction in pain. After a long ride, you should also spend a little extra time focusing on the areas you worked hard.

Here are the muscles I specifically attack with the foam roller after every mountain bike ride:

rauschpt.net/foam-roll-mtb
Click to enlarge
  1. Calf muscles
  2. Quadriceps
  3. Groin
  4. Tensor fasciae latae (TFL). Helps work the IT band and hip flexor complex)
  5. Gluteals/piriformis
  6. Latissimus dorsi
  7. Thoracic Spine extension. Great for avoiding the dreaded Rounded Shoulder posture.


* PRO TIP: When foam rolling, focus on going across the tissue fibers (i.e. laterally rather than up and down.) This lateral rolling will emphasis on “going against the grain” and most mimics a manual therapy technique called cross friction. This will restructure the muscle fiber alignment and keeps things sliding-and-gliding freely.

By incorporating the foam roller into your daily routine, you can reduce your risk of injuries, improve recovery time and overall athleticismbest of all, it will help you feel less old! So be specific, be consistent, and respect mobility with cross friction-based foam rolling.

This post has an accompanying article, “This Soft-Tissue Maintenance Routine Will Keep You On Your Bike Longer.” Click here to read it now on the Over the Hump blog.

DustinDustin Hancock, DPT graduated from San Diego State University with a bachelor’s degree in kinesiology/nutrition. He went on to receive his doctorate in physical therapy in 2011 from University of St. Augustine, and began his career at Rausch Physical Therapy and Sports Performance in 2012. As a snowboarder and mountain bike enthusiast, Dustin specializes in treating extreme sport athletes. As a physical therapist, Dustin says he looks forward to being a companion every step of the way on his patient’s path to recovery.

Click to learn more about Dustin and our other physical therapists »

Four Strength Exercises All Baseball Players Should Add to Their Training Program

JM-BLOG
BY JONATHAN MELTZER, DPT, RAUSCH PHYSICAL THERAPY

In my blog “How to Keep Injuries from Killing Your Big League Dreams,” I discuss four ways youth baseball players can take better care of their bodies and get in the most efficient shape possible so that injuries don’t keep them from playing ball at the next level. One of these ways is to implement a global strength program into your training regimen, which emphasizes building entire body strength rather than simply focusing on your throwing arm.

The Best Exercises for Building Entire-Body Strength

A proper strength training program will not only will this improve your overall athletic performance, but it will also help you to avoid the common overuse injuries that are plaguing youth sports today. However, I’m not just talking about strengthening the arm, but rather the entire body. I really can’t emphasize enough how important it is for baseball players to work on their shoulder stabilizers to improve their back, core and lower-half strength, as well as balance.

Here are my four favorite stabilization and strength training exercises for preventing injuries:

1. Planks

Planks are great for total body stabilization and core. Perform this plank series every day to increase your strength.


Front Plank – Hold for 45 seconds.


Side Planks  – Hold for 45 seconds on each side.

2. I.T.W.Y. on Swiss Ball with Weights

For this exercise you’ll need 1, 2 and a 3 lbs. dumbbells and a swiss ball. As you move through the sequence below, keep your abs tight and lifted so your back is flat. Perform 2 sets x 15 reps (2 x 15).


” I – 3 lbs. weight”


” T – 1 lbs. weight”


” W – 2 lbs. weight”


” Y – No weight”

3. Side-Lying Dumbbell Pyramid

To perform this series, lay on your side with 1, 2 and 3 lbs. dumbbells in front of you. Place a rolled towel between on your side and top arm, just below the elbow. Grab the 3 lbs. dumbell first, and lift up and down, keeping the elbow glued to the hip and shoulder blades squeezed together. Do 30 lifts or until fatigue, then move to the next lowest weight, repeating the same movements. Once you have completed reps with each dumbbell, roll over and do the other arm.


3 lbs. weight first.

lbs. weight.


Finish up with the 1 lb. weight, then switch sides.

4. Swiss Ball Core Series

This tricky series will strengthen your core and improve your balance.


Roll down the ball until you’re in a plank position, then do a push up. (2 x 15)


Tuck knees toward your chest. (2 x 15)

Core Series

Lift your hips into the pike position. (2 x 15)

By implementing these four exercises into your current strength training program, you can begin to greatly improve your entire-body strength and stability, two very important keys to athletic success and a long, healthy baseball career.


StaffHeadshot-JonJonathan Meltzer graduated from the University of Redlands with a bachelor of arts in biology and a minor in physical education. Following graduation, Jonathan discovered his passion for physical therapy while working as a Physical Therapy Aide. After graduating top of his class from Loma Linda University in 2012 with a Doctorate in Physical Therapy, Jonathan began his career at Rausch Physical Therapy and Sports Performance. Jonathan’s goals are to identify limitations and treat his patients with the most recent and innovative techniques in order to maximize functional independence and obtain his patients’ individual goals.

How to Avoid and Manage Arthritis in Your Knee

SEAN
BY SEAN SWOPES, DPT, RAUSCH PHYSICAL THERAPY

The term arthritis, or more specifically Osteoarthritis (OA), refers to degeneration of the articular cartilage of the knee. While OA is most commonly associated with knee pain in 40-60 year olds, it is not something specific to old age. In fact, most people—regardless of their age—have some form of OA, but it’s the severity that usually determines the onset of pain.

What causes arthritis in the knee?

Photo Credit: AAOS OrthoInfoMost of the body is comprised of cartilaginous tissue, and having arthritis means that that cartilage is breaking down. When you have OA, the “hyaline cartilage” at the end of the long bones in your leg (Tibia and Femur) is breaking down. Healthy hyaline cartilage provides cushion to long bones and provides a smooth surface for movement to occur; in appearance, this tissue is very white and smooth. In contrast, degenerative hyaline cartilage appears red and irritated.The breakdown of this articular cartilage leads to excessive wear and tear on the joint, causing inflammation, which ultimately results in pain.

OA can also form through injury to the intra-articular (joint) surface of the knee. Injury to the (tibiofemoral) joint can lead to bleeding within the joint, which leads to further degeneration of the knee.

How can I avoid arthritis in the knee?

While many people may think arthritis is just a part of growing old, there are steps you can take to help minimize the risk of arthritis effecting your knee or your quality of life.

Improve strength in your core, not just your legs

Since humans walk upright, our pelvic and core stability can determine the effectiveness of those knee stabilizing muscles. Hip strengthening exercises can improve the stability of the legs and decrease abnormal stress to the knee joint.

Activity modification

If you knee is painful and inflamed, switch to lower impact activities. For example, if running is irritating your knee, go for a swim or bike ride instead; these two activities still allow for good cardiovascular training but decreases stress to the knee.

Strengthen your legs

The body adapts to the daily stress we place upon it. While we can often tolerate our day-to-day routine without over-stressing our knee, we are all one-weekend-trip-at-Disneyland away from causing damage to the knee joint. As simple as it sounds, strengthening the muscle surrounding the knee can help to reduce the risk for arthritis. The goal of strengthening is to place the load into the muscle, which takes the stress away from the knee joint.

Four ways to improve arthritis-related pain and function

While unfortunately this condition is degenerative and non-reversible, those who are diagnosed with OA can still address limitations to improve knee function and manage pain. Four ways to improve function with OA-related related pain include:

1. Adequate range of motion (ROM)

Five Exercises to Increase Surfers’ Paddling Strength and Endurance

Blog-Ash
BY ASHLEY, MPT, RAUSCH PHYSICAL THERAPY

How well did your shoulders hold up to the El Niño this winter? Building strength through your shoulders and upper back to improve paddling endurance is your key to paddling out in bigger surf, catching bigger waves, and being able to stay out for longer surf sessions.

Strengthening the rotator cuff, scapular stabilizers and upper back are all key components to improve paddling strength. The rotator cuff muscles are extremely important for stabilizing the shoulder joint, which is the most mobile joint in the body. Specifically, strengthening the external rotators of the rotator cuff act to counterbalance the more dominant internal rotators (pecs & lats), minimize muscle imbalances when paddling, and promote good shoulder mechanics. Enhancing strength and endurance of the scapular stabilizers will also help you maintain good shoulder mechanics to prevent injury during extended periods of paddling.

Exercises for paddling endurance should focus on high reps and low weight, while exercises for paddling power should focus on increased weight with lower reps to maximize overall strength. As you build strength, it’s important to maintain shoulder mobility and flexibility by stretching and foam rolling before and after every session to minimize any joint stiffness throughout the shoulder and upper back, as well as to minimize muscle fatigue and soreness. Check out my previous surfing blog for the Best Foam Rolling Exercises for Surfers’ Shoulders.

Five Exercises to Target Muscles for Paddling

While the best way to gain paddling strength is actually getting out in the water, these five exercises can help compliment the work you do in the water, on dry land:

Exercise 1: Scaps Clocks

Scap Clocks

Promotes endurance of the upper back and shoulder

  • Start with the right arm. Pull tension in the band to 1 → 3 → 5 o’clock. Repeat with left arm, pull band to 11 → 9 → 7 o’clock. Make sure to keep your shoulders down and back; standing against the wall is a good cue for upright posture.
  • Perform 10-15 reps on each side.


Exercise 2: Alternating Rows with cables or bands

Alternating Rows

Promotes stabilization and endurance of the shoulder blade while paddling

  • Keeping your elbow at your side, pull the band back while squeezing the shoulder blades together.
  • Perform 2 sets of 20, increase resistance if you’re not fatigued by the end of the set


Exercise 3: Alternating Lat Pull-Downs with cables or bands

Alternating Lat Pull-Downs

Builds paddling endurance through lats for a strong pull through the water

  • Stand in a partial squat to activate your core. Pull the band down towards your hip, keeping your elbow straight. Let the tension out of the band slowly to return to starting position. Alternate arms.
  • Perform 2-3 sets of 20 on each side alternating strokes


Exercise 4: Prone external rotation/internal rotation on swiss ball

Prone External/Internal Rotation

Promotes rotator cuff strengthening while paddling

  • Lay prone on the swiss ball, keeping your back straight and chin tucked. Start with the shoulder abducted and externally rotated in the ‘90/90 position’ (as shown in photo.) Internally rotate your shoulder to simulate paddling while keeping your shoulder and elbow aligned.
  • Perform 2-3 sets of 10, add light weight (1-3 lbs. dumbells) as strength improves


Exercise 5: Simulated paddling on swiss ball with band

Simulated Paddling

  • Keep chin tucked and shoulders back and keeping your elbow straight while pulling. Slowly let tension out of band to return to overhead position, alternate arms.
  • Perform 2-3 sets of 20 on each side alternating strokes

Training to build muscle strength to help you paddle longer and faster will improve your overall surfing endurance. The best way to practice paddling is getting out in the water; these specific paddling exercises are to help compliment the work you do in the waves. See you in the water!


StaffHeadshot-Ashley2Ashley Heller, MPT is the newest member of the Rausch PT team. She received her Masters of Physical Therapy degree at California State University, Long Beach and is passionate about working with patients with shoulder, knee and ankle injuries. With background in orthopedic-related injuries and post-operative rehabilitation, Ashley believes that the combination of manual therapy and personalized therapeutic exercise program is vital to recovery. As a physical therapist, it’s Ashley’s goal to help her patients better understand their injuries and the plan for their road to recovery.

Click to learn more about Ashley and our other physical therapists »

Rausch Physical Therapy Celebrates 10 Years of Innovation and Growth

LAGUNA NIGUEL, CA (May 2, 2016) – Rausch Physical Therapy & Sports Performance (Rausch PT)—a leader in the physical therapy field that specializes in taking patients from injury, to recovery, to peak performance—today announces the tenth anniversary of the company’s founding.

Kevin Rausch, president and owner of Rausch Physical Therapy & Sports Performance.Rausch PT was founded in 2006 by president and licensed physical therapist Kevin Rausch when he was 27 years old. While other privately-owned physical therapy clinics have seen little-to-no growth in recent years, with many having to close their doors, Rausch PT stands out in the field thanks to its president’s unique vision for operating physical therapy practices.

Since the start Rausch has aimed to be an innovator in the field of physical therapy. Rather than rely on a broken health care system and physician referrals, Rausch wanted to provide a holistic option for rehabilitation, preventative health and wellness. After moving from a 2,000 sq. ft. suite to a 9,000 sq. ft. one, the company not only expand its physical therapy practice, but also to added an on-site, full-service Pilates studio and massage therapist wing. An on-site sports performance lab was added a couple years later, boasting the kinds of technologies that one can typically only access as a professional athlete, including an AlterG® Anti-Gravity Treadmill® and Hypoxico Altitude Training System. In ten years Rausch PT has grown from one physical therapist and 2,500 annual visits, to six licensed PTs on staff and more than 18,000 annual visits.

“Our clinic has taken the lead by not only offering the most thorough and specific rehabilitation programs in the field, but also by integrating the latest rehab technology and on-site wellness offerings that you just cannot find anywhere else under one roof,” Rausch said. “I’m proud of what we’ve been able to accomplish as a company in the past 10 years, but more importantly I look forward to continuing to expand people’s minds on what physical therapy can be.”

While most people think of hospitals and nursing homes when they think of physical therapy, Rausch PT specializes in active patients who want to get back to doing what they love, whether that be completing an IRONMAN, jogging a 5K, or simply chasing after their kids. Instead of being clinical and sterile, Rausch modeled the feel of his PT clinic after his grandfather’s sports bar—a welcoming, intimate escape for therapy.

“We’re in the business of making people feel good, and I don’t just mean their injuries,” Rausch said. “I want patients to look forward to coming here because it’s social and fun, everyone knows your name, and everyone is rooting for you to achieve your goals.”

By offering the highest quality rehab programs and latest technological advances, Rausch PT has earned its reputation as the “go-to” clinic for Orange County triathletes, runners, swimmers and cyclists, in addition to patients who live active, on-the-go lifestyles. Clients include everyone from ultra-trail runners and amateur cyclists, to weekend warriors and moms-on-the-go.


About Rausch Physical Therapy

Founded in 2006, Rausch Physical Therapy & Sports Performance in Laguna Niguel, Calif. specializes in taking patients from injury, to recovery, to peak performance. Its sport-specific, licensed physical therapists combine their expertise in human mechanics with the clinic’s innovative rehabilitation and performance technologies to help its patients stay healthy and reach their goals.

For more information, contact casey@rauschpt.net (949) 276-5401 x 106 or visit rauschpt.net.

RauschPT-Logo

My Own Worst Patient

Blog-Jess
BY JESSICA SNYDER, DPT, RAUSCH PHYSICAL THERAPY

A college running injury is what originally introduced me to the field of physical therapy. I remember being so frustrated that I could not run and no one seemed able to “fix” it. I was bounced around between the university’s medical staff with no resolution. It wasn’t their fault; they had a lot of athletes to cover and I simply fell through the cracks. But, I was also extremely stubborn and continued running. In pain. Because no one had a better solution.

It was finally my mom who intervened. She did some research and found a physical therapist that she thought could help me. The physical therapist was the first person who took the time to listen to my symptoms, evaluate my injury, and explain to me what was going on and what needed to be done in order to get me running again. Finally! A diagnosis, an explanation, and a plan.

That’s when I knew I wanted to become a physical therapist.

On Top of the World

When I received my doctorate of physical therapy degree, I couldn’t help but think about how I’d come full circle—how I was now going to be that person that helps someone get back to doing what they love. I felt so grateful that this is what I was going to do with my life.

Flash forward, and I’ve now been working at Rausch Physical Therapy & Sports Performance for four years. I still run daily, and I haven’t really had to deal with any of the major, sidelining injuries that plagued me back in college. I’ll admit that I started to lose sight of PT from the perspective of a patient. It took a recent personal injury to remind me why I love this field so much.

Last month I was snowboarding at June Mountain when I fell on my butt and completely threw out my SI joint. That’s when I got my worst patient of all time: Me.

The Fall

I couldn’t walk, let alone run. Getting in-and-out of the car was terrible. I couldn’t bend down to wash off the dog’s muddy paws, and I also couldn’t mop up the floor. I couldn’t even chase after my best friend’s daughter when she took off running towards the street—half a step and shooting pain across my back.

At first, I was okay with it. As a PT, I was able to self-diagnose myself with a badly sprained SI joint, which I knew would require time for the inflammation to go down and scar tissue to form in order to stabilize it. But, this professional practicality quickly faded into personal distress. By the end of the first week, I was in the anger phase of my depression. I was constantly on the verge of tears, I was ready to give up trying to stay active, I had even convinced myself that I would never run again (Completely irrational! It had only been a week!)

Then, something amazing happened. One of my favorite parts of being a PT is chatting with my patients while I’m treating them, and inevitably my frustration with my injury came up. That’s when my patients started repeating all the things that I had at some point told them during their recovery:

“Jessica, you know tissue healing takes a minimum of four weeks.”

“Be patient, Jess! Why don’t you take this time to focus on strengthening?”

“Allow your body to heal properly; you don’t want to push it too early and create a chronic problem.”

I was transported back to that time in college, when someone was able to pull me out of my injury-induced spiral when I felt hopeless. But this time, that person was myself! Coming through my incredible patients! I was so grateful for their explanations and words of encouragement, and I was finally able to tell myself, “Pull it together and stop acting crazy!”

Getting Back Up

So, I made a plan. I started to focus on what I could do, and used this injury as an opportunity to be more creative with my exercise routine. I started to be grateful for the little things that I was slowly able to do, walk with less pain, finally lie down on my back, and almost lift my foot to put on a shoe.

Recovery is a process. As a patient, I think it’s important to know that your physical therapist has chosen their professional field for a reason: we’ve been there, we get it, and thanks to this recent fall of mine, I am more motivated than ever to get you back to feeling your best.


StaffHeadshot-Jessica copyJessica Snyder (PT, DPT, ATC, CSCS) received her Doctor of Physical Therapy degree at the University of St Augustine for Health Sciences – with an emphasis on orthopedics, movement science, and manual therapy. Jessica started her career as a Certified Athletic Trainer working with high school, college and professional athletes. She is also a Certified Strength and Conditioning Specialist (enhancing her ability to build custom strength, stability and performance-centered rehabilitation and return-to-sport programs) and Certified Natural Running Coach. Being a runner herself, Jessica specializes in running-related injuries, including the entire lower extremity. She is also passionate about treating headaches and neck/shoulder pain.

Click to learn more about Jessica and our other physical therapists »

Proper Pitcher’s Hip Rotation and How to Get It


Remember that game Twister? Every time that spinner landed on a new color, you were forced to reach your hand behind your back, underneath a leg, and across the board, all while trying not to fall. While incredibly entertaining, this silly game can also be a valuable lesson about positional torques, balance, rotation and flexibility—especially when it comes to baseball.

Looking at the specific qualities to win this game can be related to the critical components of the throwing motion in baseball. Often times when assessing a pitcher’s mechanics, there’s a miss in relating the lower half to the upper half of the body.  It is crucial for a pitcher—no matter the age—to begin to learn the importance of max hip rotation in order to achieve full torque of the trunk and obtain maximal velocity through the pitch.

The Sling Shot Effect

The rubber band of a sling shot is wound up with so much tension so that when it’s released, a massive amount of kinetic energy hurls the rock (or projectile of your choice) forward. The pitching motion in baseball is similar in that the lower half of the body, starting with proper foot placement and maximal hip rotation, will create a buildup of kinetic energy through the trunk, shoulder blades, shoulder and finally release through the fingers.

Proper Hip Rotation and How to Get It

Without proper hip rotation, a pitcher’s hips will fly open, which creates torque at the elbow. To avoid this, we want proper hip rotation, which occurs when:

  • The hips are fully rotated just before the lead foot strikes the ground
  • The shoulders are closed with arm extended out into the cocked phase of throwing.

Proper rotation allows for maximal hip-to-shoulder separation, which in turns creates the most amount of torque and velocity possible. There are two specific keys to obtaining this position and preventing further stress on the arm, the lead leg and posture.

The lead leg

The lead leg must be relaxed from the knee down and have proper landing position. Proper landing position includes:

  • Toes pointing slightly towards the right-handers box (if a right-handed pitcher.)
  • The hips will remain closed until just before lead foot strikes the ground.
  • At this time they will lead their front hip towards the plate and really turn open the front hip at the latest possible time.
  • If done properly, the pitcher shoulder feel tightness along their oblique muscles, NOT their back.

Posture

When a pitcher transitions from early-stance phase to the cocked position, their posture can completely affect their ability to rotate through their hips and finish off a throw. For example, if a pitcher is bent too far forward when their foot lands, they will not have the ability to achieve full pelvic rotation, thus not allowing this maximal hip/shoulder separation.

The key for good throwing posture is to focus on balancing and creating extension or back-bending through the middle part of the athlete’s back. It has been statistically proven and correlated that the optimal position of posture is the thoracic spine slightly extended, slight lean towards the back leg, and non-throwing hip flexed up. Therefore, it is important to not allow early rotation of the trunk or shift the center of gravity towards the throwing arm, as both will cause the trunk and shoulders to “open early.” before the hips, and create abnormal stresses on the shoulder and arm.

Maintaining proper foot landing position and rotation of the hips will create the maximal amount of separation leading to good pitching mechanics and increased velocity. Posture is also considerably important and must be taken into account when looking at the ability to create this hip to shoulder separation.

Suggested Training and Exercises


StaffHeadshot-JonJonathan Meltzer graduated from the University of Redlands with a bachelor of arts in biology and a minor in physical education. Following graduation, Jonathan discovered his passion for physical therapy while working as a Physical Therapy Aide. After graduating top of his class from Loma Linda University in 2012 with a Doctorate in Physical Therapy, Jonathan began his career at Rausch Physical Therapy and Sports Performance. Jonathan’s goals are to identify limitations and treat his patients with the most recent and innovative techniques in order to maximize functional independence and obtain his patients’ individual goals.